
Getting gifts for those who help us and our children during the holidays can be a fun way to thank them and show them that you appreciate everything they appreciate during the year.
Yet it can be difficult to get gifts for all teachers, therapists, doctors and care providers, because many gifts can be expensive and create a lot of charge on the family.
Don’t worry; I have a great Christmas gift option for you that will not break the bank, is unique and is very nice to make with your child.
This message can contain affiliated links. If you make a purchase, I can make a committee without costs for you. Read my full revelation For more info
Today I will go through you how you can make small decorative soaps as holiday gifts. Specific, snowflake glitter soaps – perfect for the winter. They become beautiful and are easy to make at a reasonable costs.
As a Spolier it cost me $ 3.88 per soap – we made 35 soap (not including the optional packaging supplies, but those costs are minimal). The full cost execution is below.

Gifting with your child
If your child can help with the process of making gifts, it is a great opportunity to help them teach this valuable life lesson: say thank you.
During the year we meet many helpers, and we want them to know that we value their help, so we like to give small gifts to show our thanks.
Snowflake Glitter soaps
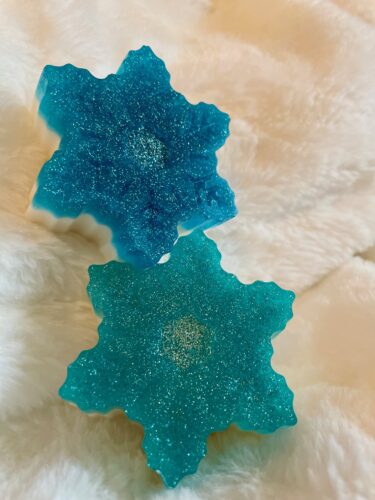
Here is a photo of the end product. As you can see, I packed them and made a cute label in Canva. There are many other soap designs that you can make; I will go through them in the post a little later.

Supplies you need for this homemade soap
You don’t need many supplies, and the good news is that they will last forever, so they will stay nice next year to use again if you make a partial batch.
Ingredients:
- Snowflake silicone shapes – 12 cavities
- White soap base (white regularly)
- Clear soap base (crystal clear)
- Extra fine glitter (we used electric blue)
- Essential oil of peppermint
- Alcohol
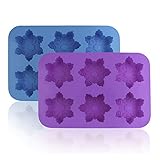
Silicone Snowflake Molds, Finegood 2 Pack Cake Pans Cookie trays Make handmade soap grinding, also for chocolate pudding Jelly Muffin Cups Kitchen Bak Decoration, 6-Hole Blue, Purple
- Practical: these silicone snowflake boxes can be used to make chocolates, cakes, candles, hard candy, fondant, jelly, ice cubes, soap, muffin, etc.
Packaging supplies (optional):
- Clear bags
- Ribbon
- Tags (Click to download a free PDF copy)
Equipment:
- Cutting board
- Large knife
- Cookie magazines (flat, not crooked)
- Food scale
- Microwave-Safe Making Cup (2 cups to a minimum)
- Spoon
- Spray bottle
Steps to make your DIY -self -soap
Click here to download instructions in a PDF
Step one: the glitter layer
First place your clean silicone shapes on a flat cookie plate. You want to be sure that they are not crooked, because the soap has to dry in an even layer.
Cut your clear soap base in chunks in chunks, place 14 us on your food scale and then in your microwave -safe tape cup and melt it for 30 seconds, stir and repeat until it is melted. (Be careful, it will be hot).

Measure .1 OZ essential oil and stir in. Or if your essential bottle oil has a dropper, add 50 drops. (This is a great counting exercise for children).
Note: If it is your first time you make it, maybe start with a little less essential oil. You can always add more to your mixture if you want more odor, but you cannot remove oil as soon as it is inside (also stinking).
Then add your glitter colors. On the photos we used 2/3 blue glitter and 1/3 silver. Start with 1 – 1 1/2 teaspoons and stir. Do not go over with glitter, or your soaps can eventually feel like sandpaper.
Look at the image below; You can see the difference in color when we use 2/3 blue and 1/3 silver versus a 1/2 & 1/2 mix. The color preference is up to you. More blue = a dark tone.
If it is all combined, slowly pour your glitter soap into the shapes until it is approximately 1/3 of the capacity of the mold. If you have bubbles, you can (immediately) with disinfect alcohol Spritz to get them off. Don’t wait for this, or the disinfecting alcohol trick will not work.
Wear your drawers to cool in the fridge (or a cold garage for at least 30 minutes). Test one soap after 30 minutes by gently pressing it in the middle. You may need more cooling time, depending on how cold the environment is.
Step two: the white layer
While we make snowflake soaps, we use a white base (because a snowflake is white). You want the glitter color that you have chosen true, and a colored soap base can change the color. But for other designs a colored base can be beautiful.
Bring your cookie magazines back to the table with molds.
Then chop your white soap base in blocks and weigh 32 oz. (If you use a smaller tape cup with 2 cups). You may have to melt your blocks in part and add more because there is room in your cup.
Then measure .15 OZ essential oil or use 100 drops to start (you can always add more if you want a stronger scent). Stir to combine.
Pour your white soap base into the shapes and add it right under the edge. Do not extend the white to have enough for the forms and then go back to add more; It won’t work. The soap starts to dry fairly quickly and add more after the first cast weird bumps and nodules creates (believe me).
Spritz quickly all bubbles with the disinfection alcohol.
Let it harden at night.
Step three: Pack your DIY -self -soap
The first thing you have to do is carefully remove the soap from the molds. Just start peeling the shape back from the edges of the soap. You can run the fungal cavity inside out because it is silicone. Once you have your soaps out, it’s time to pack them.
I use transparent plastic food treats. You can get them in the Dollar Store or Walmart – here is a link for easy ordering.
Then you need a ribbon. I use about 12 centimeters per bag. I don’t try to do a chic bow. Just enough to bind it closed and add a tag, with a little extra.
For the tag. Here is a free print. It is made to be printed double -sided. Ideally, you would use a thicker cardboard. (You can always send this to your local office depot to be printed on thicker paper).
I cut out the tags, went punching and tied them.

How much soap base should I buy?
First you need to know how much soap you want to hand out. As I said above, we hand it to our physiotherapy clinic (about 18 therapists) and her teachers and school staff (about 15). Moreover, we have a few for her to give Christmas gifts to family members.
We need at least 35 soap for my family.
One snowflake soap shape contains 3 oz. There are six snowflakes on a mold and we have two forms. So ….
(3 oz x 6 soap cavities) x 2 fungi = 36 us in total for one batch glitter snowflake soap. This makes 12 soaps. So we need three batches of soap to have enough to hand out to everyone.
36 ounces x 3 batches = 108 ounces.
Remember that we need both a white and a clear soap base. Ideally, it is clear about 1/3 of the soap and the white is 2/3rds of the soap.
108 Total Ounces x 1/3 = 36 ounces clear
108 Total Ounces – 36 Ounces = 72 Ounces White Soap
For your glitter:
– 1 teaspoon = 4.2 grams
– Because I make three batches, I need about 3 – 3 1/2 teaspoon. So I will order a bag of 10 grams and a bag of 5 grams = 15 grams. (Or order 25 grams for a few dollars more and have enough for next year’s batch.)
Costs for making handmade soap
Making annual soap gifts costs everything in everything around $ 136 (for 35 soap). About $ 3.88 per soap, which is pretty good. Moreover, it is a unique handmade gift in which my child had to do a fun activity and is involved in the ‘thank you process’.
Moreover, next year I don’t have to buy essential oil or glitter, because I am left of enough of the original purchase. I only have to buy the soap base for next year’s batch. (There will be a remaining soap base of this batch if the soap sells in steps of 1 pound).
Remember that prices can and change over time. This cost execution should give you a rough estimate.
- Silicone fungus – $ 12
- Essential oil – $ 10
- Glitter – $ 11
- Vranding of alcohol – $ 8
- White Soap Base – $ 60
- Clear Soap Base – $ 35
Packaging supplies are minimal because you can get bags and ribbons in the dollar shop if you want.
Other soap forms and scents for the whole year
There are many nice silicone shapes (these can be used for bins, pudding, chocolates, etc.). And some will be great soap. Just switch off your scents and glittering colors.
- Flowers
- Pink glitter
- Jasmine Essential oil
- Heart
- Red glitter
- Cinnamon essential oil
- Bees and honey shape
- Yellow glitter
- Honey essential oil
Tips for making perfect snowflake Glitter soaps:
- Pour your soap completely into the mold, leave no space and try to add remaining soap later; It will be lumpy.
- Use immediate alcohol spray immediately after casting, or the bubbles are cured and the spray does not work to get rid of the bubbles.
- Do not use a glitter ribbon. You get glitter everywhere in your house.
- Use flat cookie blades, no old crooked cookie blades. You need the sea pests to harden flat and evenly.
At the end of the day
Every year my daughter and I look forward to this holiday activity; It is now a beloved tradition. Moreover, my daughter has a lot of fun at school who challenges it to her teachers.
I hope you give this glitter snowflake soap a chance, because I know that you will have a lot of fun making them!
#Easy #cheap #Christmas #gifts #children