How to Roast Garlic in a Cast Iron Garlic Burner: Step-by-Step Guide and Tips

How to Roast Garlic in a Cast Iron Garlic Burner: Step-by-Step Guide and Tips

4 minutes, 33 seconds Read

Roast garlic in a cast iron garlic burnerCut the top off a garlic bulb, drizzle it with olive oil and place it cut side up in the roasting pan. Cover and roast at 400°F for 45 to 60 minutes until tender and golden brown. Once cool, squeeze the cloves and use them in spreads, sauces or save them for later.

What is a cast iron garlic burner?

A cast iron garlic burner is a purpose-built, compact pan made of enameled or bare cast iron, often shaped like a garlic bulb. It features a lid with airflow holes and is designed to hold one or two whole heads of garlic. The cast iron material retains the heat and distributes it evenly, creating ideal conditions for slow caramelization. It works in standard ovens, on grills or over an open flame. The closed chamber mimics a mini oven that retains moisture and delivers consistent roasting results.

Why roast garlic in a cast iron garlic roaster?

  • Eof heat distribution ensures that each clove becomes golden brown and soft
  • Hands-off cooking: Once prepared, the casserole does the rest
  • Versatility in the oven or grill allows year-round use indoors or outdoors
  • Superior taste: Roasting in cast iron produces creamy, sweet cloves
  • Durable and reusable: no foil waste and suitable for presentation

What you need

  • Whole garlic bulbs – Choose large, firm heads with tight skin
  • Cast iron garlic burner – Clean and dry with lid fitted
  • Olive oil – Helps with browning and keeps cloves moist
  • Salt and pepper – Optional spices for flavor enhancement
  • Oven or grill – Able to reach and maintain 400°F
  • Sharp knife – Used to remove the top of the garlic bulb
  • Oven mitts – Essential when handling hot cast iron
  • Optional tools – Basting brush, herbs (such as rosemary) or foil for clean-up

Schedule steps

Visual guide showing how to roast garlic in a cast iron garlic roaster
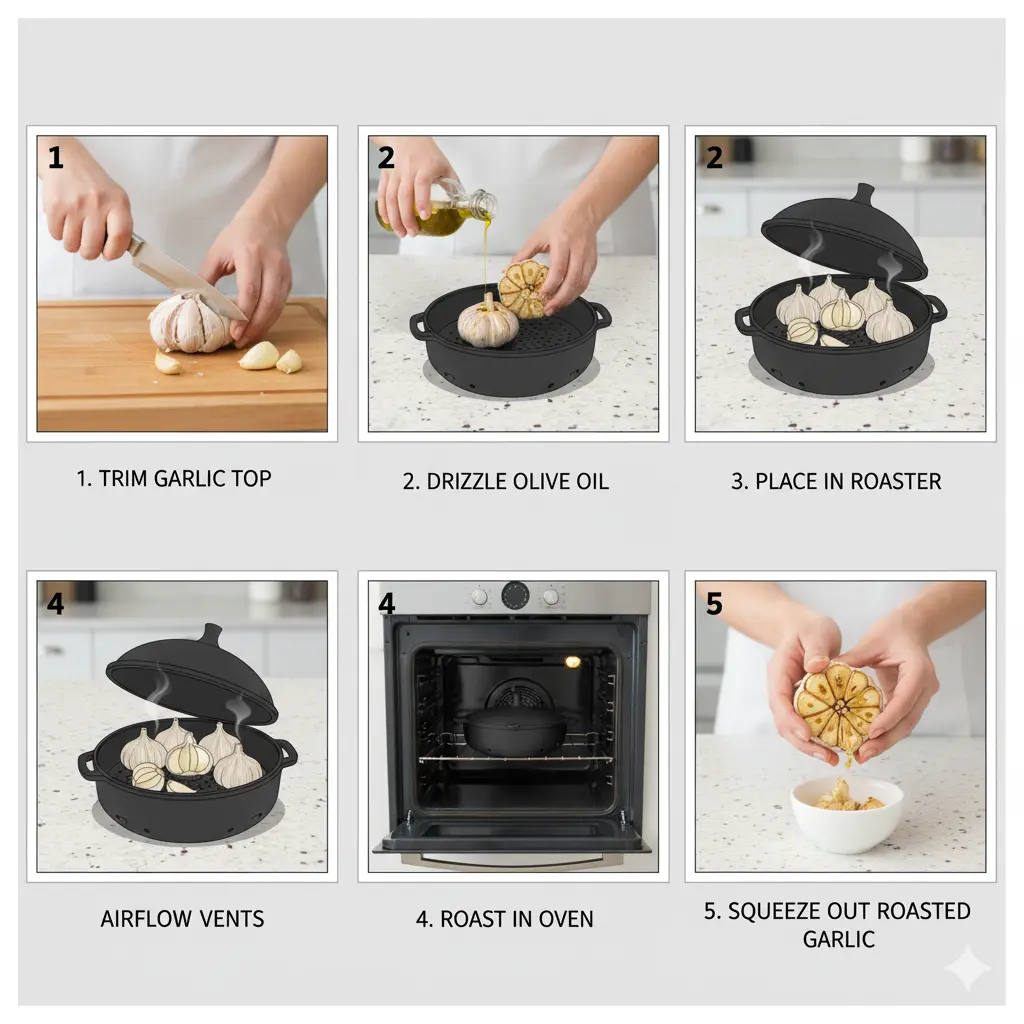
  1. Preheat oven or grill to 400°F
    This temperature is ideal for caramelization without burning. You do not have to preheat the frying pan itself.
  2. Cut the garlic and prepare it
    Cut ¼ inch off the top of the bulb to expose the cloves. Remove loose outer layers, but keep the bulb intact.
  3. Drizzle with oil and season
    Pour 1 to 2 teaspoons of olive oil over the exposed cloves. Add salt, pepper or herbs if necessary.
  4. Place the garlic in the frying pan, cut side up
    Place it in the roasting pan, cover it. If you have multiple lamps, make sure they are positioned evenly.
  5. Roast for 45 to 60 minutes
    Cloves are ready when they are golden brown, soft and aromatic. Check doneness after 45 minutes. If grilling, rotate the skillet occasionally for even heat.

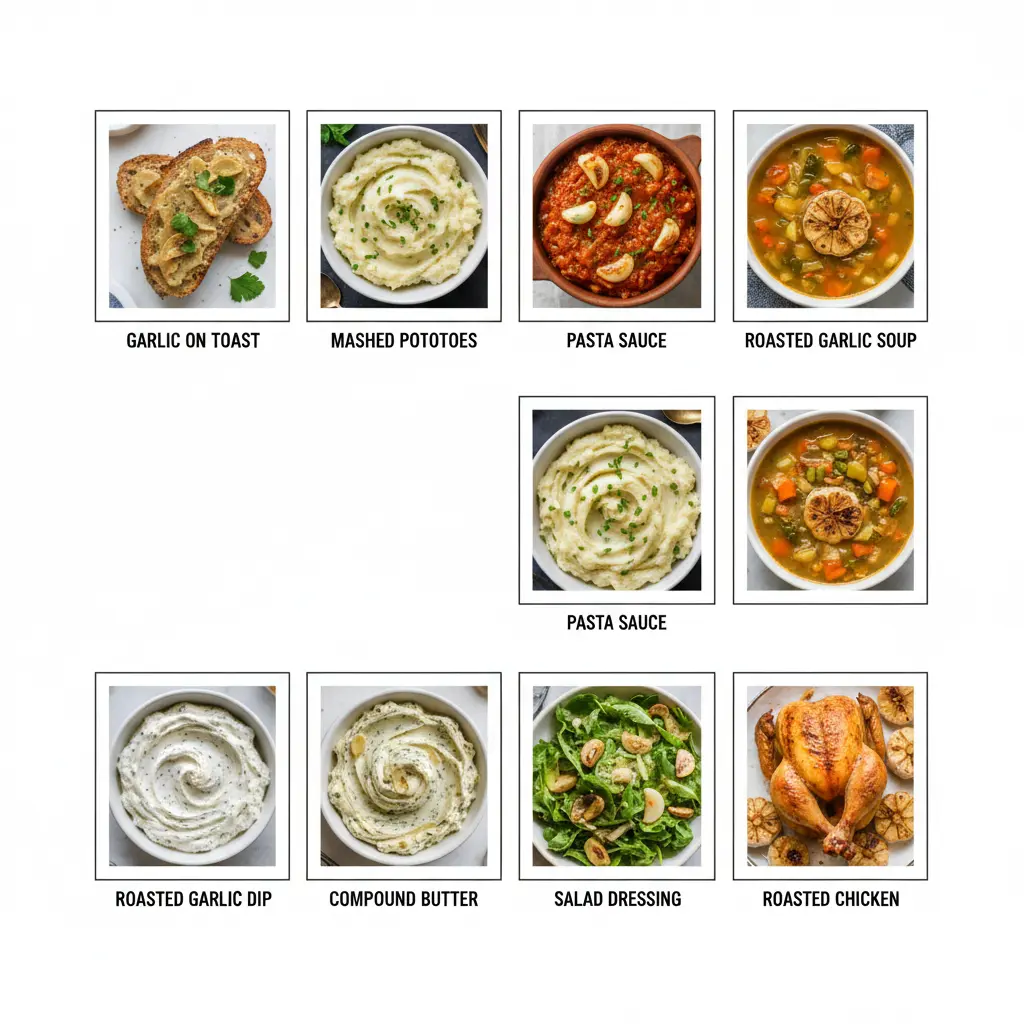
How to use roasted garlic

List of ways to use roasted garlic in different meals
  • Spread on warm bread or toast
  • Mash the potatoes or mix them into sauces and dressings
  • Mix it into soups, dips or compound butters
  • Store in the refrigerator or freezer for future use

Scheduling tips

  • Use fresh, firm garlic for the best taste and texture
  • The cut side should face up to allow good airflow and caramelization
  • Oil is not optional – it prevents drying out and enhances the taste
  • Add optional aromatics such as rosemary, thyme or paprika
  • Roast two bulbs at the same time if your roaster allows it
  • Check for doneness by softness – cloves should slide out easily
  • Always use mittens when handling cast iron
  • Alternative heat sources: gas stove or campfireworks with heat control

Cleaning and maintenance checklist

  • Allow the roaster to cool completely before washing it
  • Hand wash only with warm water and mild soap if necessary
  • Use a soft brush or scraper to remove stuck bits
  • Dry it thoroughly with a towel and then let it dry warm on the stovetop or in the oven
  • While hot, rub a thin layer of oil on the surface to preserve the flavor
  • Store in a dry place, with the lid ajar or with a paper towel inside
  • Reseason if necessary: ​​brush with oil and bake at 375°F for 1 hour
  • Odor removal option: Empty bake at 400°F for 15-20 minutes, or use a baking soda paste scrub, followed by rinsing and drying

Storage methods for roasted garlic
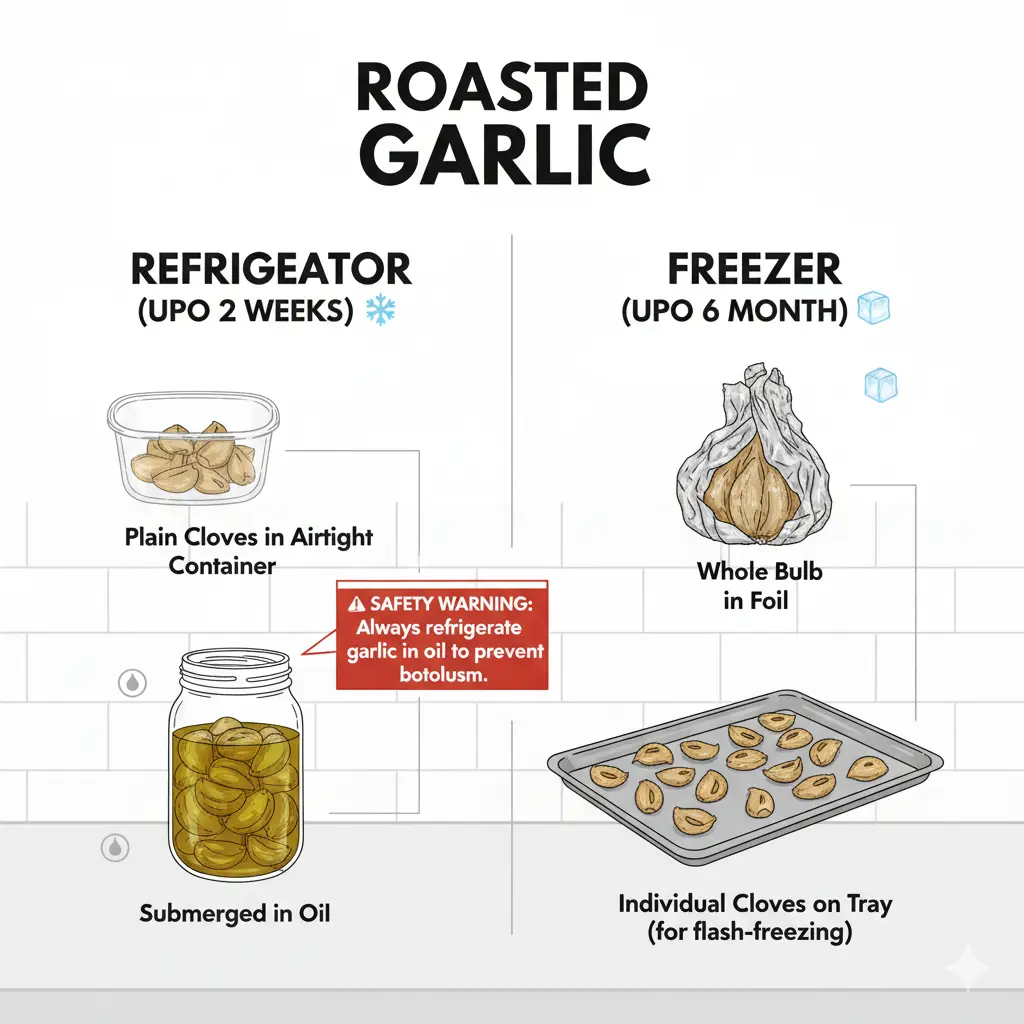
Storage Methods for Roasted Garlic in Containers and Jars
MethodDurationStorage notes
Refrigerator (common clove)3-4 daysStore in an airtight container, peeled or unpeeled
Refrigerator (in oil)Up to 2 weeksStore in a sealed jar, always refrigerated to prevent botulism
Freezer (whole heads)2–3 monthsWrap it in foil or plastic and freeze it in a bag
Freezer (individual cloves)2–3 monthsQuick freeze on the tray and then in the bag. Defrost if necessary

Never store garlic in oil at room temperature. Always store it in the refrigerator and throw it away if any strange odors or mold appear.

Conclusion

Roast garlic in a cast iron garlic burner is simple, hands-off and gives you a deeply flavored, spreadable clove. Thanks to the even heat, easy cleaning and durable design, this tool fits in any kitchen. Whether you roast one or more bulbs, the result is the same: soft, nutty garlic that enhances any meal. Try it once and you’ll keep it in your weekly rotation.

Frequently asked questions

Yes. A muffin tin lined with foil or a small covered Dutch oven can work.

It ensures that the cloves slowly soften and caramelize without drying out or burning.

No. Keep the cloves in their skins to prevent burning. Just remove the outer loose layers.

Yes. Store properly and use within the recommended storage times above.

#Roast #Garlic #Cast #Iron #Garlic #Burner #StepbyStep #Guide #Tips

Similar Posts

Leave a Reply

Your email address will not be published. Required fields are marked *