
Under the many new building functions, DIVI 5 also implements various efficiency improvements. These include improvements to the user interface and those that help you with a smoother workflow. Divi is not only faster (from a technical point of view), but it is too to use faster.
Expand attributes is one of our favorite efficiency functions. It started as extended styles in Divi 4 and only expanded element level styles to other elements. Expansion of attributes makes this first function 10 times more powerful. In this message we show you how to expand presets in Divi 5, so that you can make even more targeted changes during your page design.
Let’s go there!
Preslines in Divi 5
With presets you can group related styles for reuse on your entire site. They are a visual way to approach a class -based design system.
For example, a button element can have styles for the text, the button background, the edge radius, icons and hoverstaten. If you want to reuse the styles, keep them as a preset (or a few presets, depending on your own system) and you bring those presets to other button modules.
The two types of presets
Although we have dealt with this in detail elsewhere, there is a refresher course here. There are two types of presets in Divi. Element front settings and preset settings for option group.
Element front settings are Preslines that only accept styles of comparable types of elements. Presentations on button level can be used on other button modules. Pre -settings on section or Rhine level can be used in other sections or rows. The design options of the button and a row are extremely different, so they can’t really be an element -before set parts.
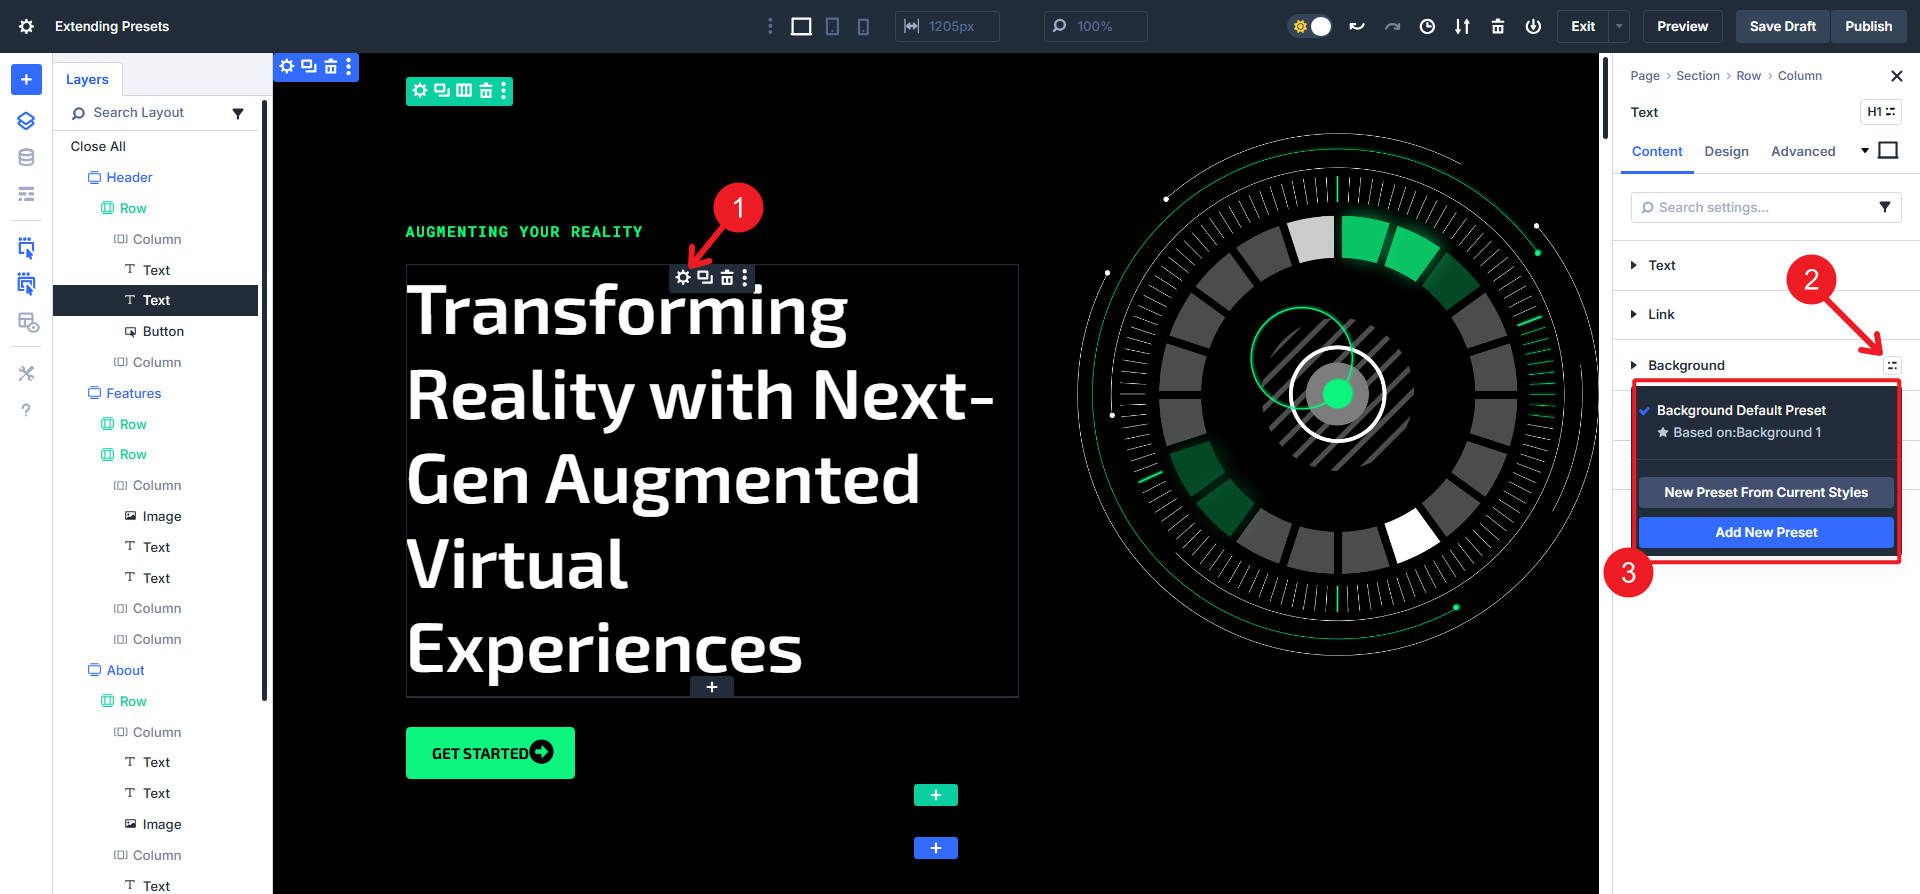
Even these two very different elements, however, share some design settings in common. They can both accept a background color, interactions, Z-index and others. Realizing that designers could save much more time and design with more consistency if they had access to save presets at the option group level, we have allowed that exactly.
Option group pre -settings are smaller, more atomic groups of design styles. You can see what an option group in DIVI is based if it has a special drop -down list in the settings/design panel on the right. Not all option groups allow pre -settings (such as the Option Group Loop), but almost all design -related OGs have the option to save pre -settings. When you float about one of these OGs that support those presets, you will see an icon appear. If you click on this, all currently stored presets will be displayed under that option group (each has at least a “standard”).
How to expand the presets in Divi
Expanding presets is a great way to fill in a page with wire list with your designs to select selective elements (or option groups) while walking through your design. They only need one thing – for you to have stimulated styles on at least one in advance. You can’t expand ‘nothing’. Likewise, all similar elements already share the same standard preset. So you have to design something and make a predetermined to start.
Make an element set in advance
We start with the easier pre -set, an element set in advance. A CTA module is an excellent place to start. Buttons are also good because there is a good chance that you have at least a few variations, so it is a good candidate for a preset.
Add your module to a page in Divi. I will use a CTA module because it has several sub-elements that I want to design at the same time. Once you have a button design, you can store those styles at element level as an element set in advance. In this way those styles are easily reusable on other CTA modules. Make a new preset based on current styles to do this quickly.
Make sure you give it a useful/descriptive name and save the element in advance. Now you can use that preset on other modules of the same kind. It is important that you now have a provision to expand to multiple buttons on a page.
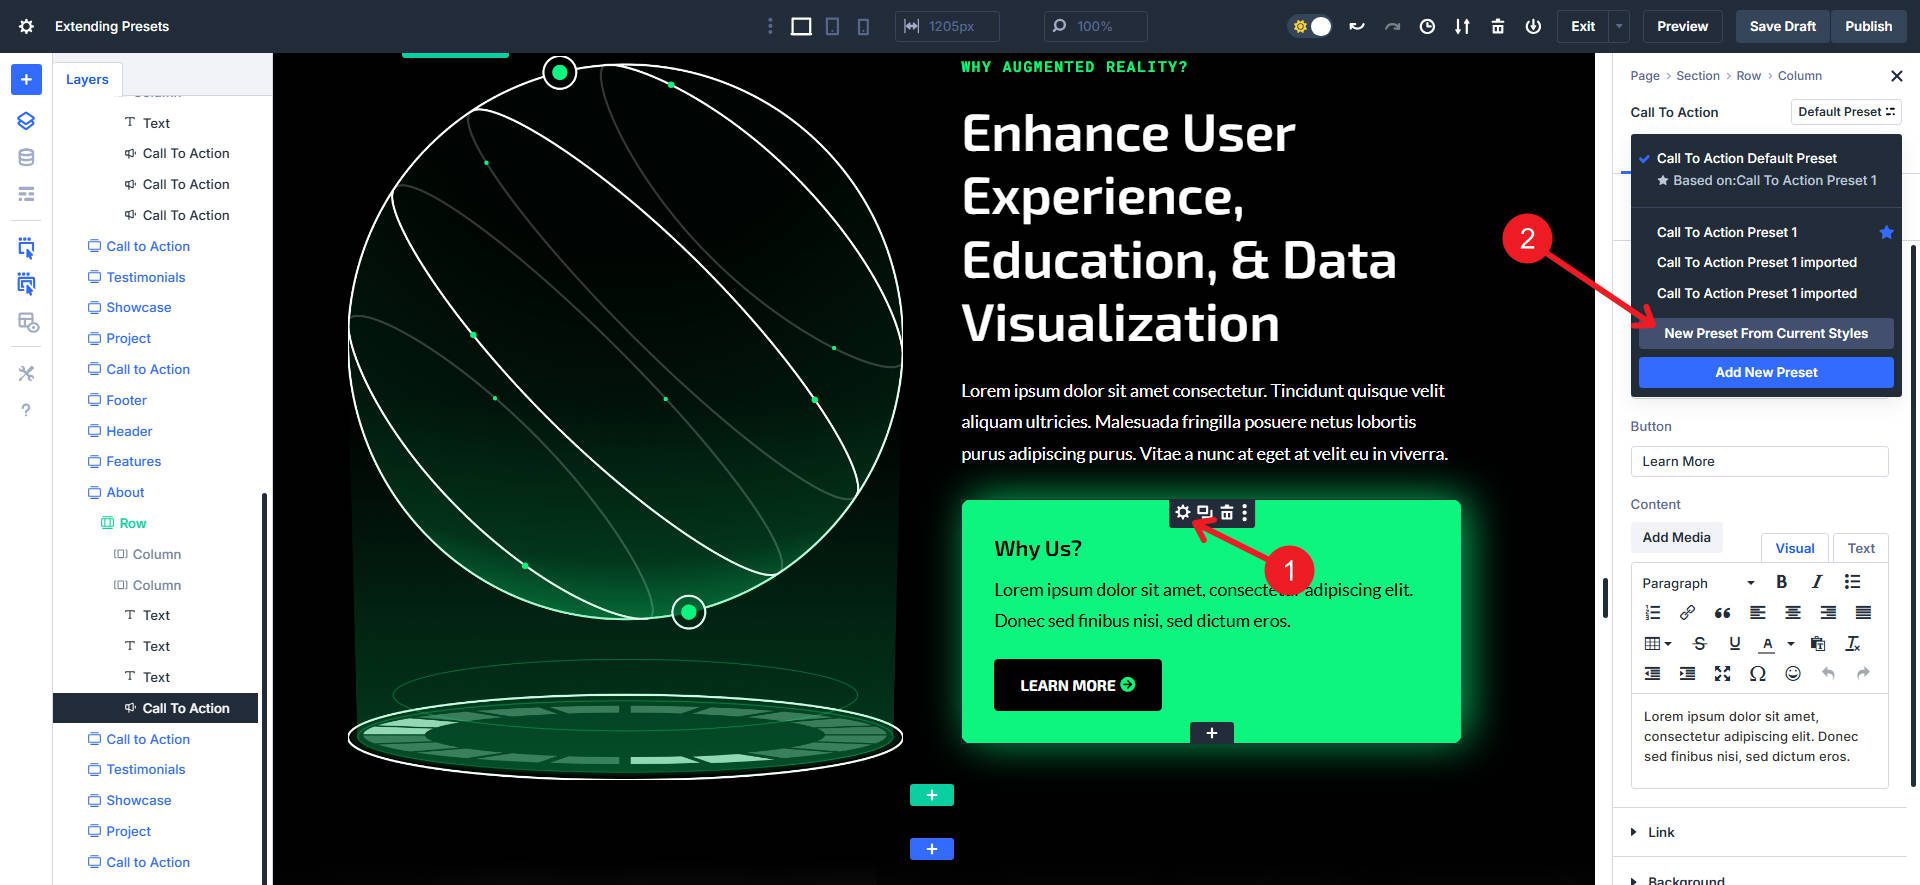
Make a pre -set option group
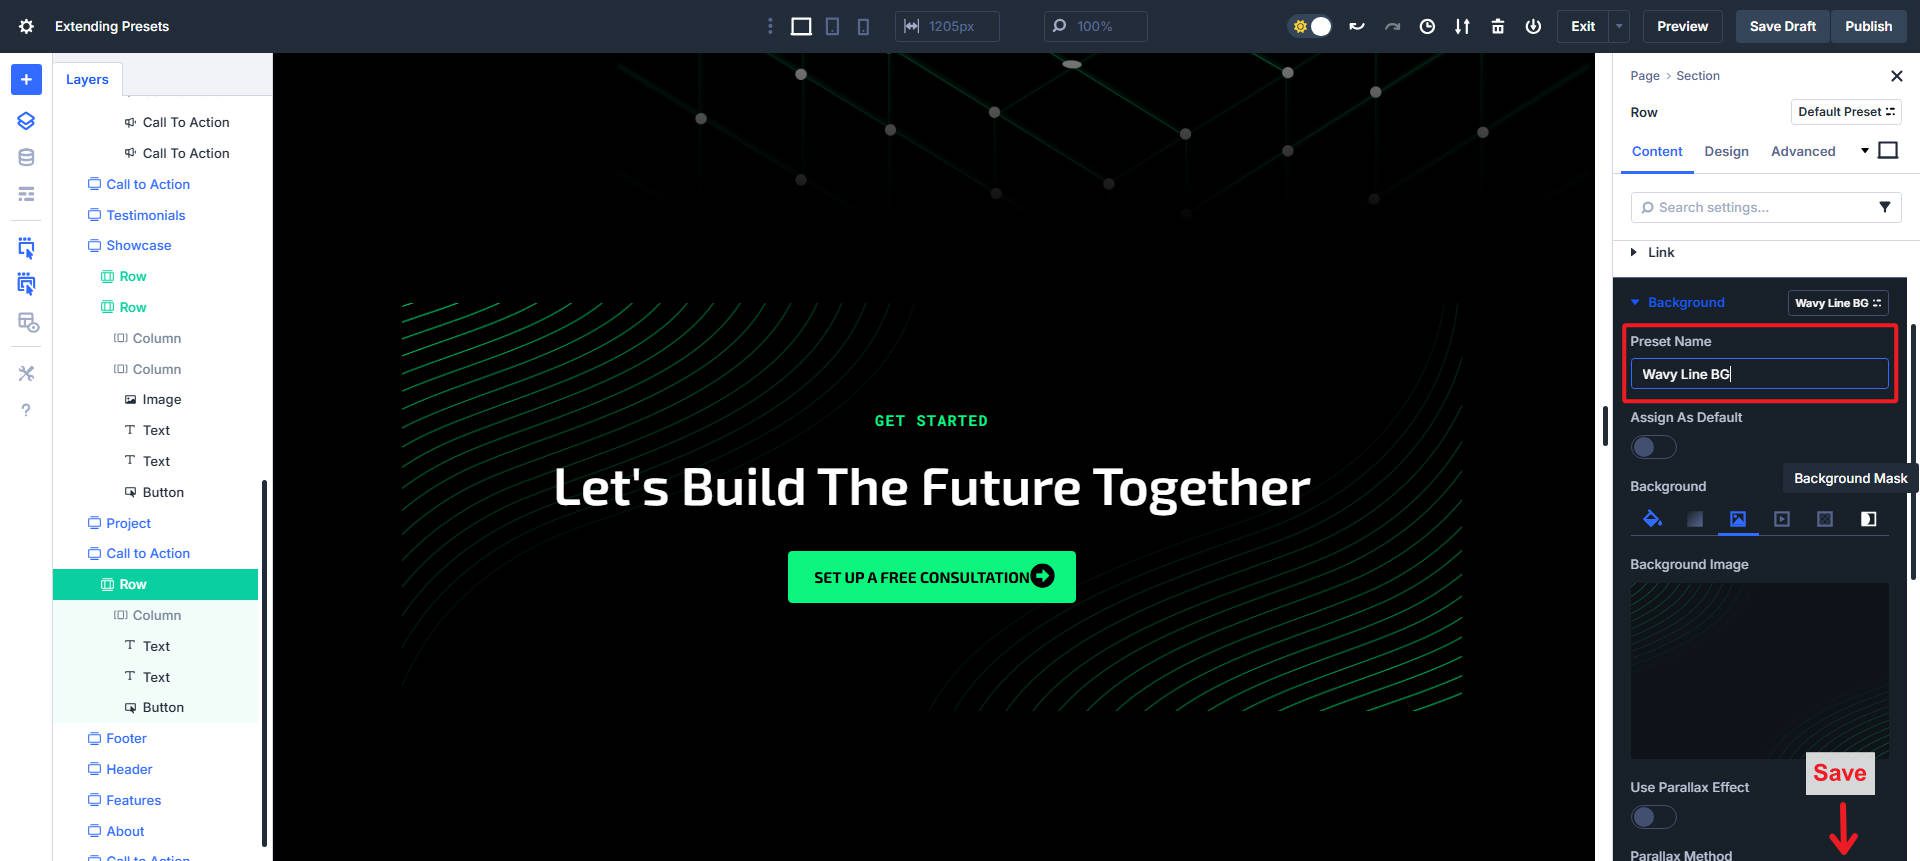
Option group instruments are modular And focuses on a group with one style – think of edges, distance or titles/heads – things that exist on multiple modules or containers. Here I set up a design for an element background. Then open the OG Preset Dropdown menu.
We can move the styles from the option group to an OG preset by clicking on “New preset of current styles.”
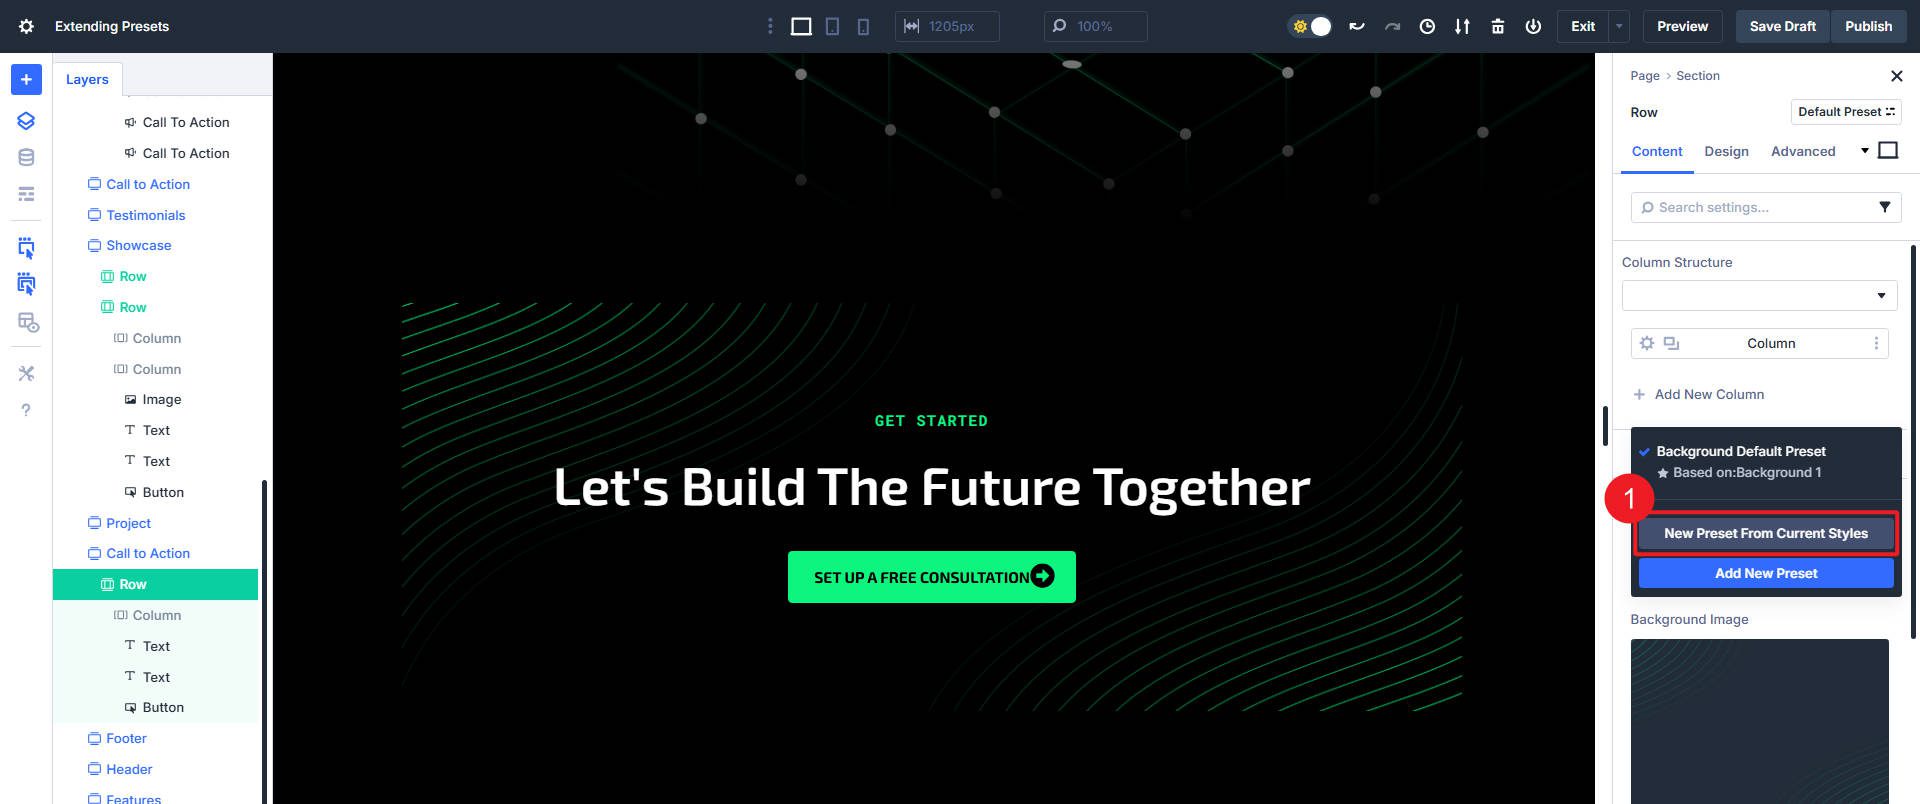
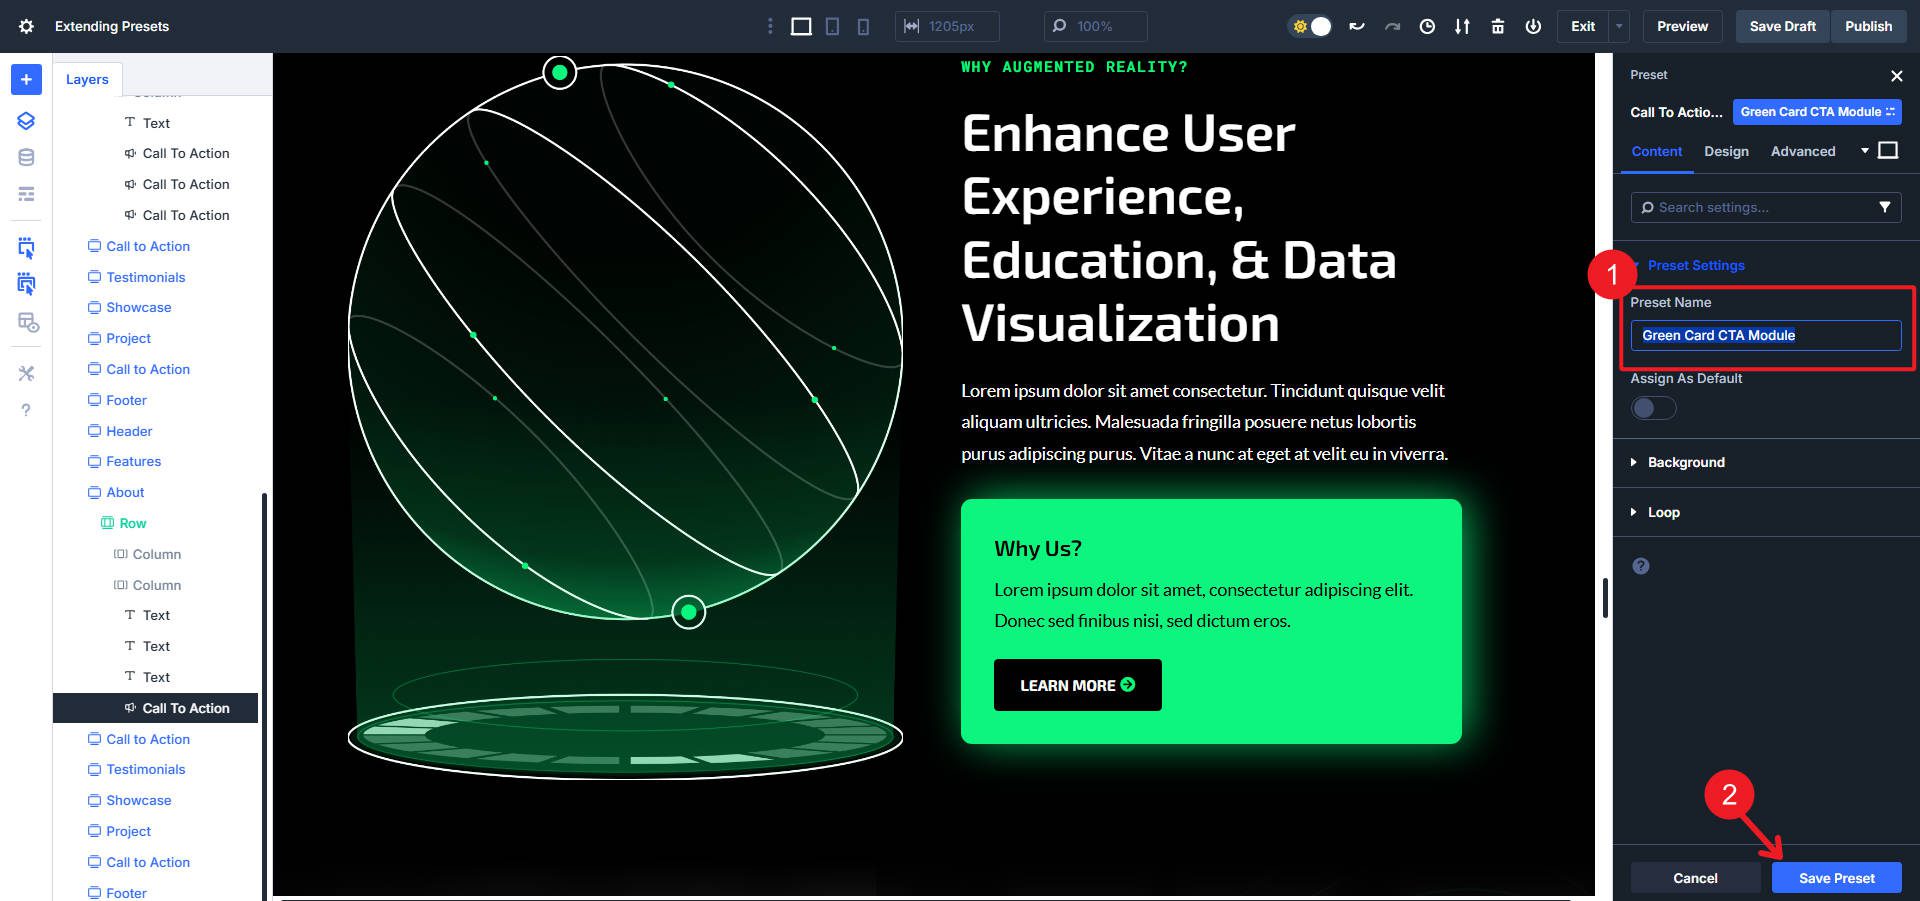
Give the preset a name and click on “Save”.
How to open the Extend Preset panel
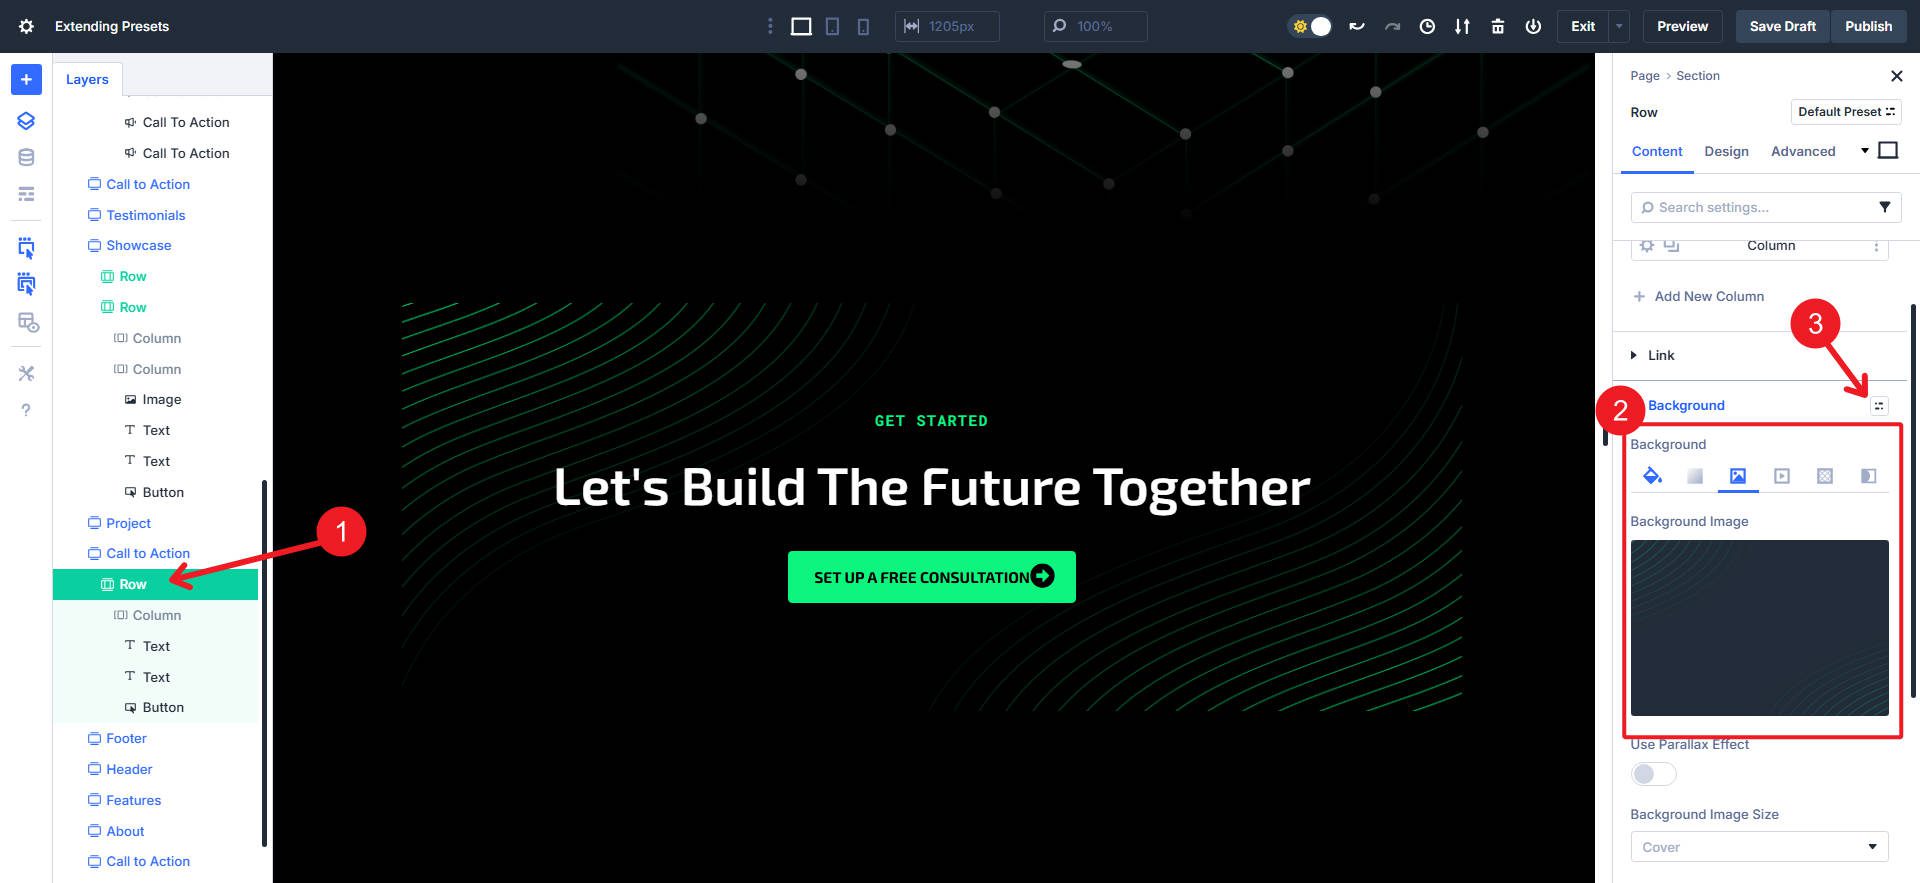
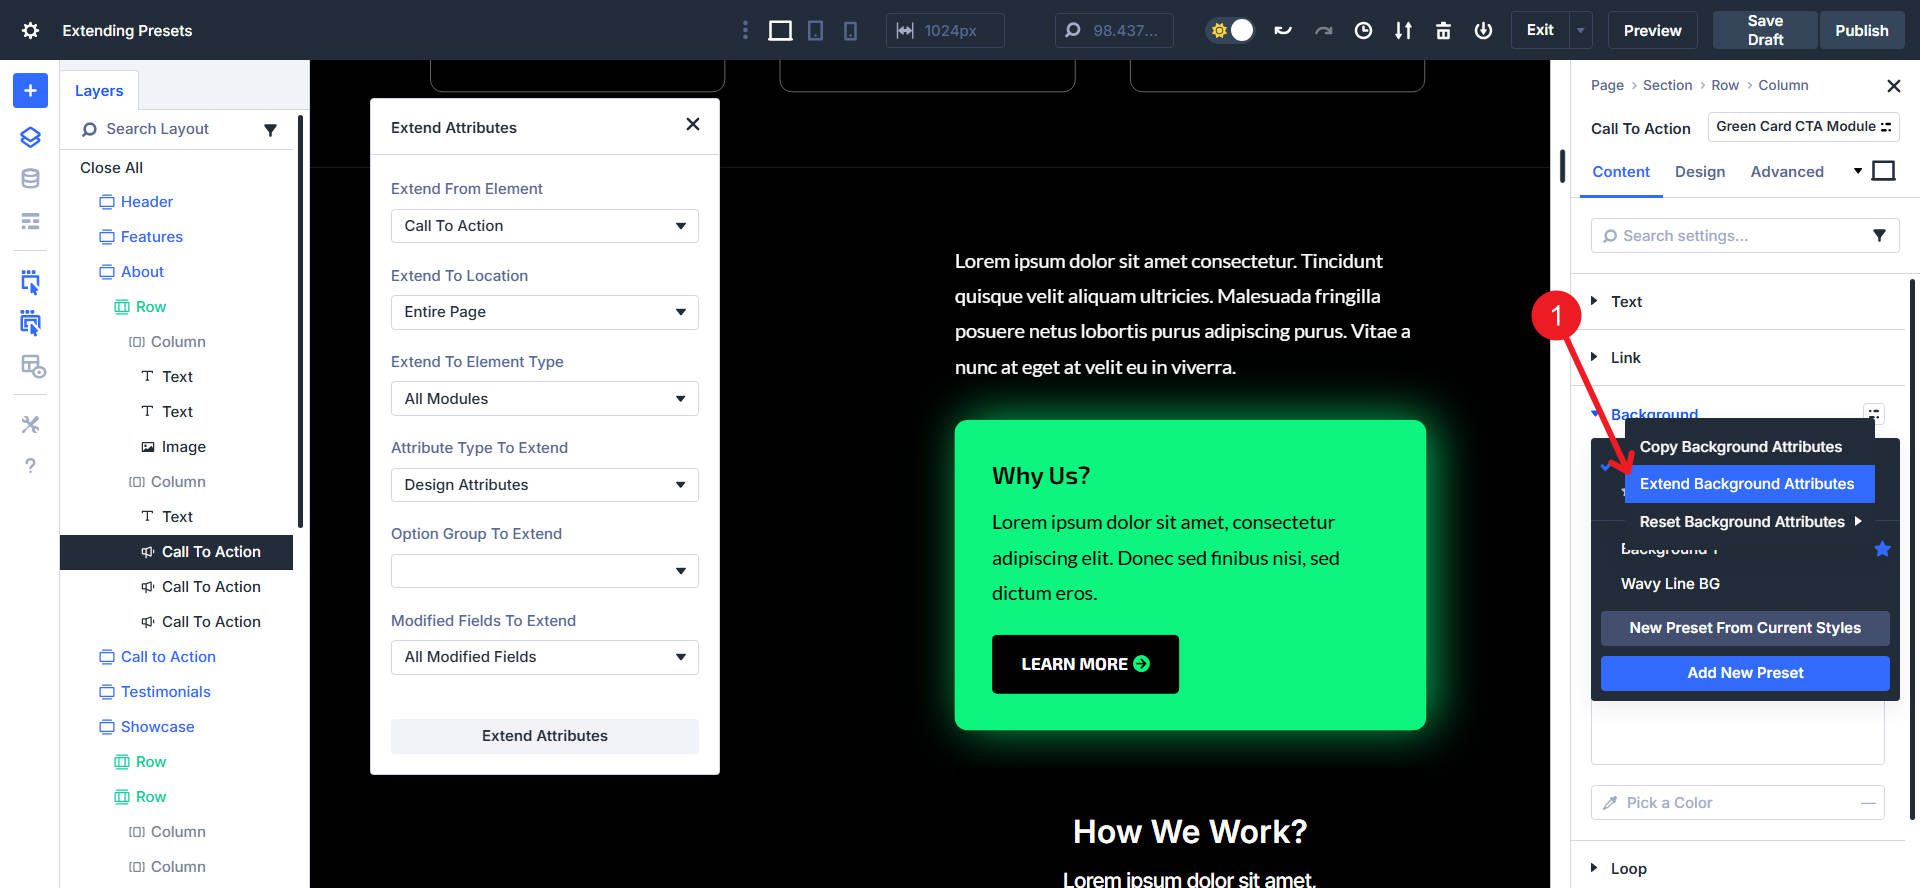
Right -click in the Visual Editor, click the three punch icon in the layer panel or right -click on the group preset icon of the option group that you want to expand.
After you right click on one of these surfaces, you will find and select and select “expand attributes”. When you try to expand a group prescription, you will see “extend attributes *” (where * is the group name from which you are extending). So for this example we see “background attributes.” This brings a pre -selected extensive average that we can adjust to our needs.
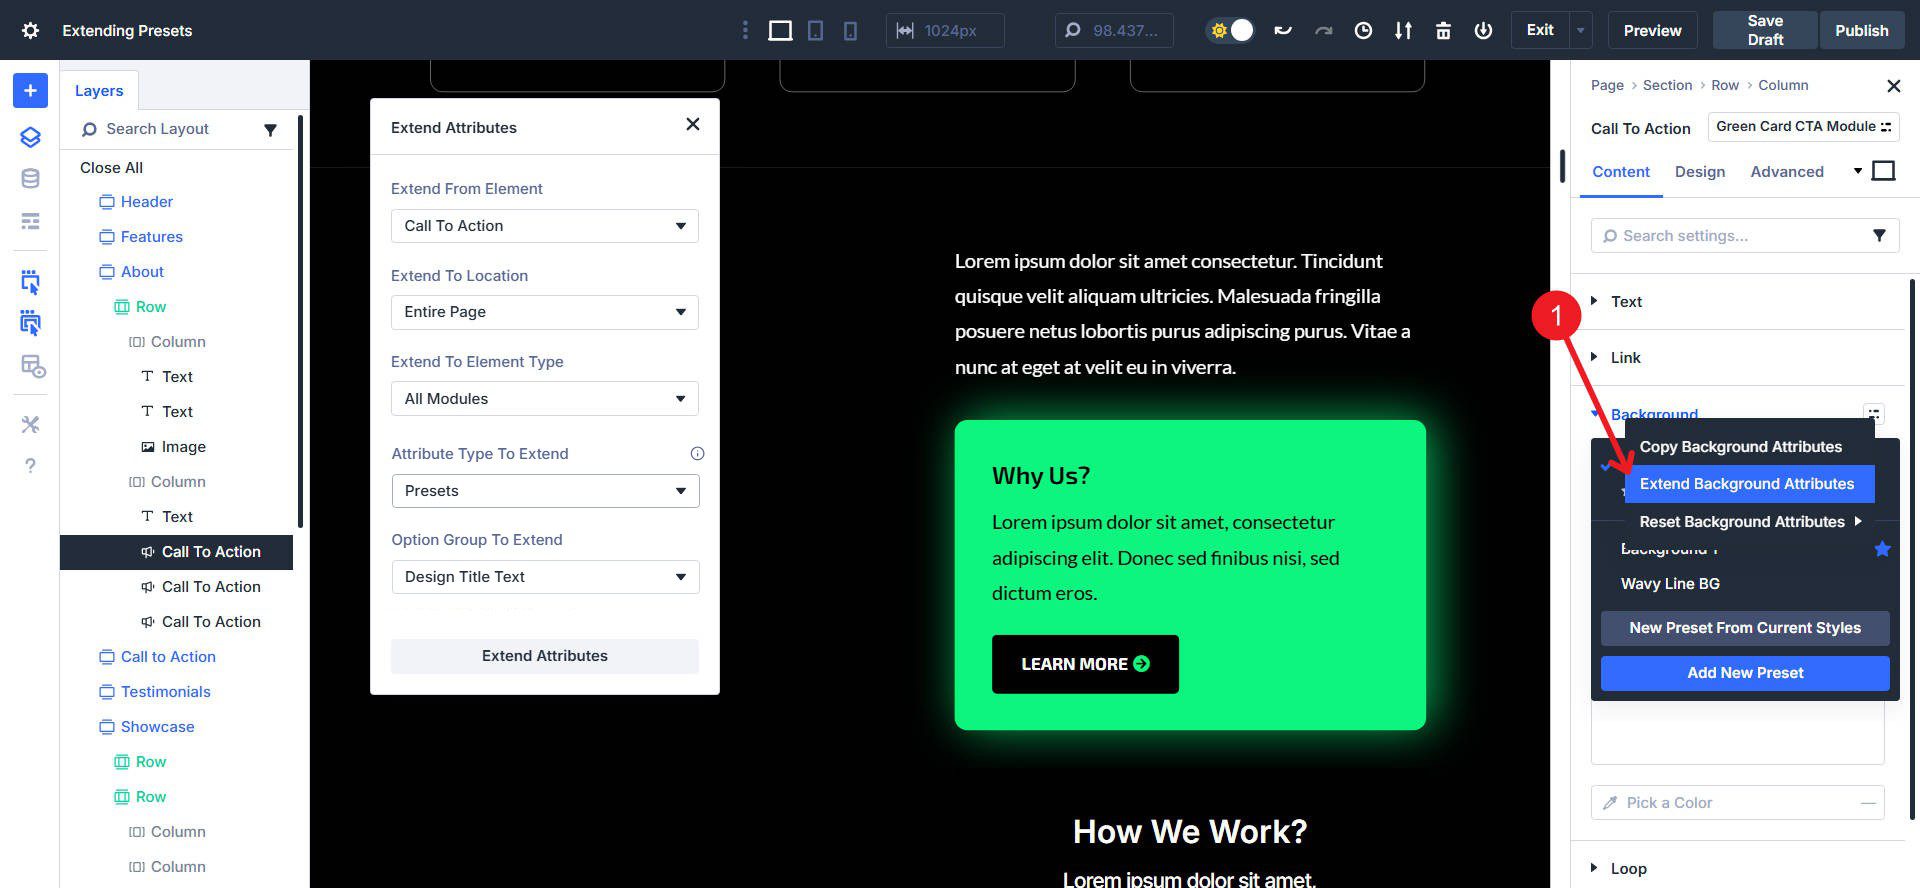
The Extend Presets option only works for options for options group. If you want to expand elemental settings, you must use the Extend Design attributes option (or apply the element in the element, which does not take much time).
Using the Extend panel
There are many different options in the expansion panel. But a few of them are automatically filled and the others help you manage the scope of your extensive action. Here is a breakdown of every option.
Extend By Element
Usually beforehand filled with everything you can originally express with the right mouse button to expand.
Extend Nasty Location
This refers to the scope that will endure the expansion. Expand through the entire page, the parent part/row, or only by his children.
Expand to the element Type
This is an important option that limits the type of elements (modules or containers) that receive the preset. For example, if you want to apply a Randradius OG -Preset to buttons alone, you can limit the element type.
Attribute Type To expand
This is usually selected on the basis of what you choose to expand for presets, but you change it to be more or less specific.
- All attributes – Expand everything, including content, presets and modified styles that you have copied from the source element.
- Design characteristics -Reid all design -related attributes, Including presets and modified stylesof the source element. ** This is the only way to expand elemental settings.
- Style characteristics – Expand only the changed styles that you have copied from the source element (so no presets will be expanded with this option).
- Contents characteristics – Expand only the content characteristics that you have copied from the bronelement.
- Provision – Expand only the option group (s) from the source element.
Modified fields to expand
This option is not available when expanding only a predetermined. But if you expand design characteristics (presets + modified styles), you may see this option to limit to very specific changed styles (so no pre -set expansion).
When to use Extend Presets
Preslines are a phenomenal tool. They are easy to set and even easier to implement in modules or option groups. They take your hard work and make it usable on your site. Adding a preset to a module was easy in itself. Easily enter a non -drained module/element/option group and point the preset in advance.
However, if you have many such modules/elements/option groups to which you want to assign the preset, you can expand them in one go. The time savings are more pronounced if you realize that you can extend presets and static styles at the same time. Much less copying and pasting. Below is an element in advance for the CTA module that is being expanded, together with a CSS class to all matching elements.
This expanded all presets, static designs and even CSS classes from the original CTA module to the next. Imagine that you still have a CTA card pile lower and all this expands in 7 seconds to 5 modules.
Try to extend the attributes in Divi 5 today
Divi 5 improves in each category. It is faster, has more functions and has fresh user interface and time -saving shortcuts. It has never been a better time to be a divi user.
If you want more, read the Deep Diving function. Start with design variables for a scalable system that you can trust. Then learn to transfer to the designed design. If you need more, follow it with more information about extending characteristics.
Ready to try Divi 5? Use it on your next new site -build or jump in the demo To see how Divi 5 was built for the future of website building.
#extend #presets #extensive #attributes #Divi