
In this post, we’ll discuss how you can use a Divi Canvas to make website design changes right where you work. Let’s get started!
What is staging and why is it important?
When redesigning a homepage, you may want to test different hero sections or rearrange content blocks. Making changes directly to your live website means every visitor sees your work as you build it. They will come across half-finished sections, test content, and layouts that you are still tweaking.
Subscribe to our YouTube channel
A staging environment is a separate copy of your website that allows you to test and implement changes before they go live. You can experiment with new designs, test different layouts, and try out ideas without affecting what visitors see. You can compare how changes look on different devices and switch between them.
You can also share previews with customers or team members. Once everything is working as desired, you can move the changes to your live site.
This approach keeps your public site stable while you work on it. Visitors always see the finished version and you get the freedom to test without haste. You can take the time necessary to get things in order before anything goes live.
However, most staging installations require separate servers, local development environments, or third-party tools. You work in one place and then sync files and databases to another. The process takes time and adds complexity to each update. Major updates may require a separate test site, but there are alternatives for smaller operations.
Introducing Divi 5 Canvases
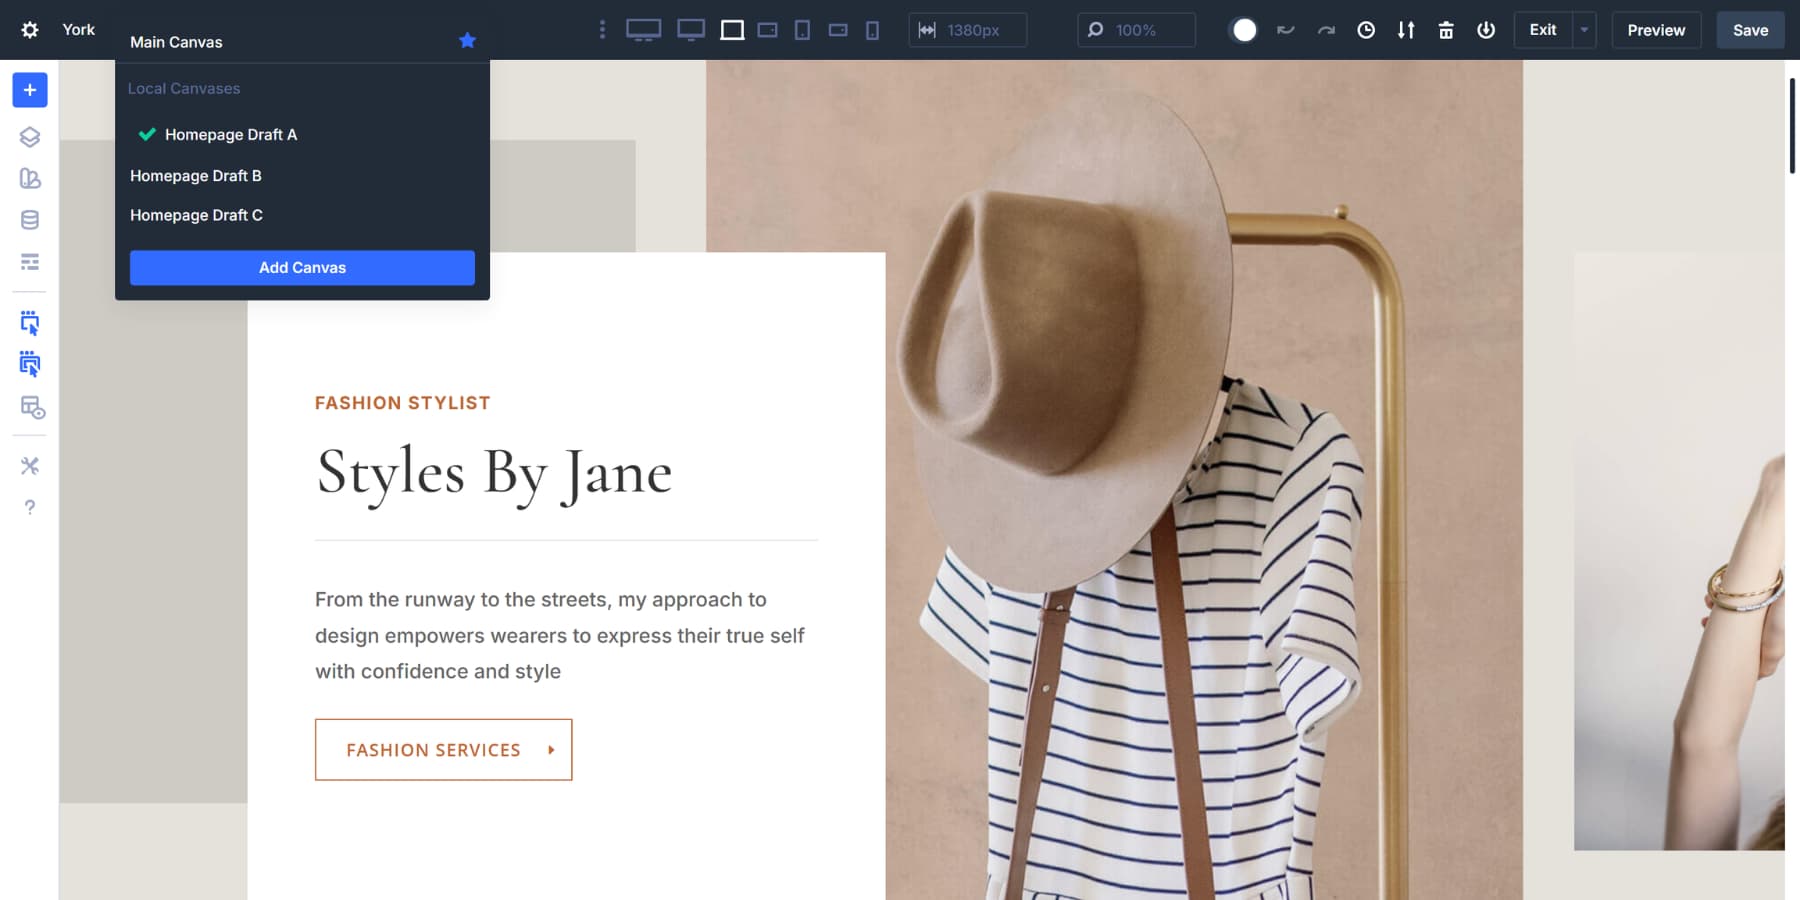
Canvases in Divi 5 are separate workspaces within the Visual Builder. Your page always has a main canvas where your content resides. However, you can create additional canvases that remain completely separate from the main area.
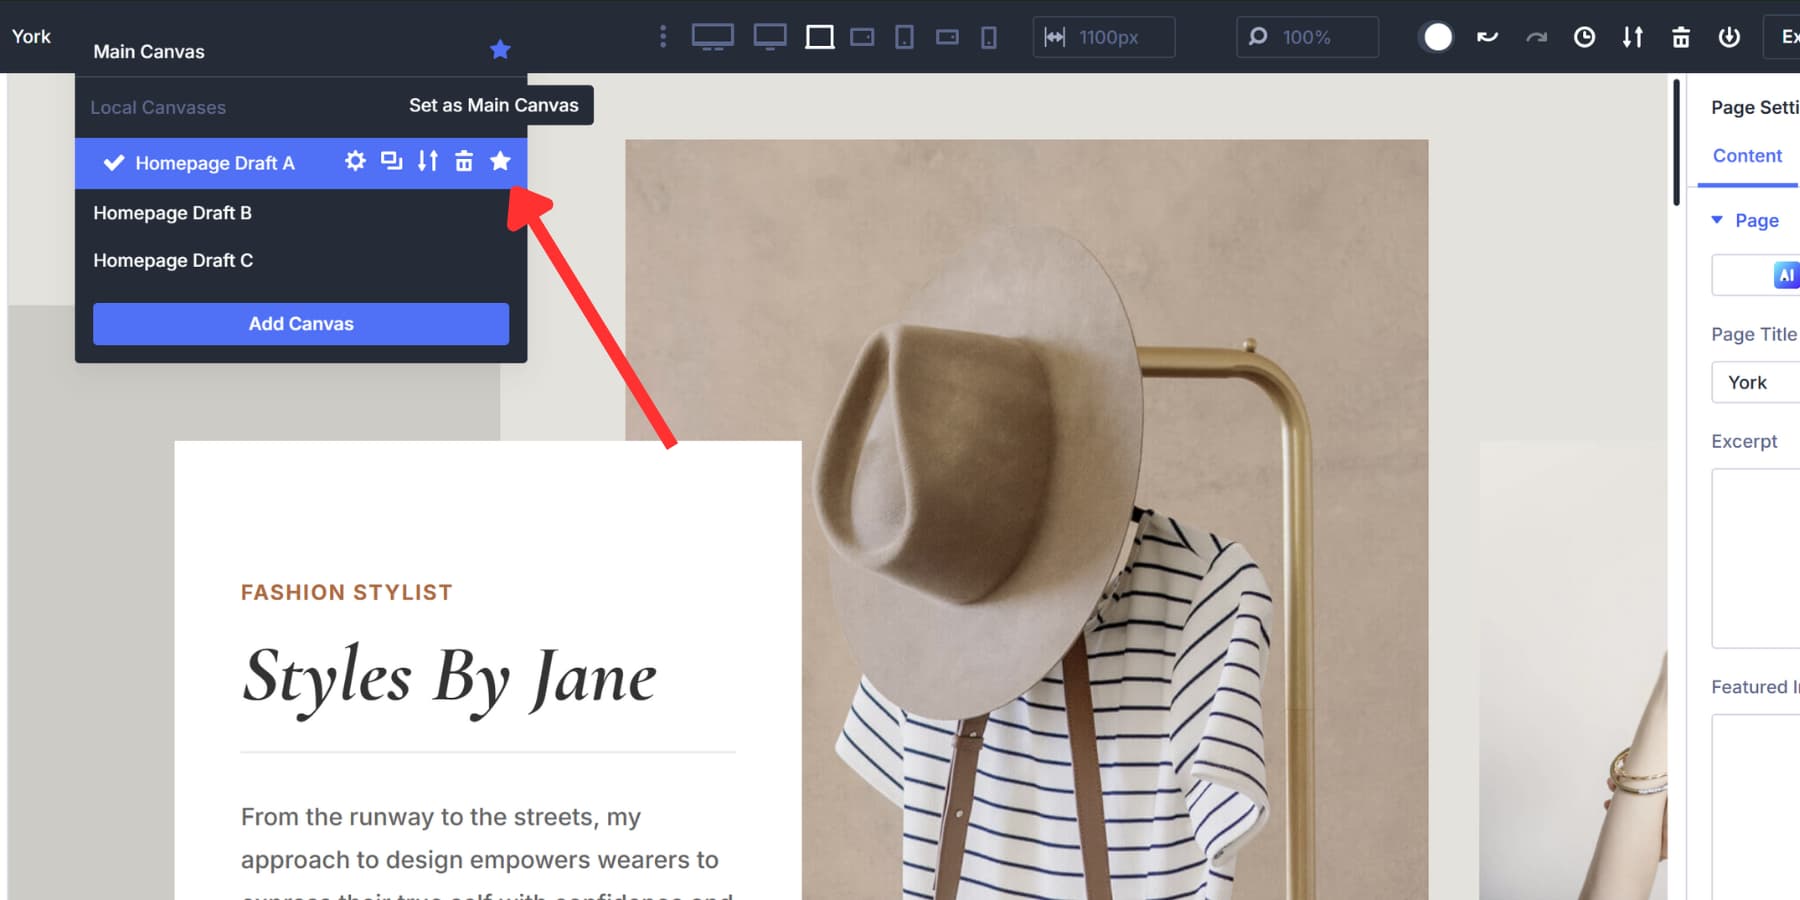
These freestanding workspaces will not appear on your primary page view or directly to your front-end visitor. You can create menus, popups, sidebars, or other components off the canvas without cluttering your main editing space. Switch between these using the Canvas dropdown at the top of the builder. You can create canvases globally (available across your site) or locally, keeping them linked to specific pages.
They also work with interactions. Set triggers for your main content that show or hide Canvas elements based on click, scroll, or hover. The entire system keeps everything organized and gives you complete control over what appears.
We’ve also built a Canvas Portal module to insert Canvas content into specific parts of your page. Drop a Canvas Portal module where you want that Canvas to appear, select your Canvas from the dropdown and you’re done. The content appears exactly where you placed the portal.
How canvases create isolated workspaces for stage presentations
Canvases can be used as a podium, because they are really separate from each other. When you create a new canvas, it exists in its own space. You can take layouts apart, rebuild sections, or scrap entire designs without touching the live version.
The Visual Builder keeps them completely separate until you assign one as the main canvas or connect it (for example, to interactions or a canvas portal). You can create multiple canvases and instantly switch between them to work on different versions of the same page.
This isolation gives you the freedom to test without consequences. Create a striking new homepage design in a separate Canvas, while keeping your current homepage active. Visitors never see the experiments, half-built sections, or ideas that didn’t work out. They only see what you want to make live.
Creating a designer stage space with Divi 5 fabrics
You’ve mastered the concept. Let’s move on to building a staging workspace. The entire installation only takes a few minutes once you know where everything is located. Here’s how to do it:
Duplicate your main canvas
Start by opening the page you want to redesign in Visual Builder. Your current layout will remain on the main window and we will need to copy it before we can make any changes.
Look at the top left corner of the builder. You will see a Canvas drop-down menu there. Click on it to view your canvases. Hover over the main canvas item and select the duplicate icon to create an exact copy of your main canvas as a new, detached canvas.
Everything is transferred: your sections, rows, modules, styles and settings. The copy is in its own workspace, completely separate from your live page. After you create a new canvas, go to it.
Give your new Canvas a meaningful name by clicking the settings icon when you hover over it. Give it a good name, such as “Homepage Staging” or “Redesign Draft,” so you can easily identify it later. This naming step helps avoid confusion when working with multiple canvases.
![]()
Make changes to your staging canvas
Select your staging canvas from the drop-down menu. The Visual Builder loads your duplicated layout and all editing tools work exactly as they do on your main canvas. To verify this, you can check the name of the current canvas by looking at the drop-down menu at the top left.

Click on a module to open the settings panel. Adjust text size, weight, style and more. Drag sections to reorder them. Add new rows and modules via the insert menu. Remove elements you no longer need. Any changes will only be saved to this Canvas.
This is also a good time to clean up your design system. Open the Inspector to view all the colors, fonts, and spacing values used on your page and make sure everything is set up correctly.
Discover static values and replace them with design variables for better consistency. Use Find and Replace to swap old hexadecimal codes with your brand’s color variables for multiple elements at once.
You can also pull saved layouts from your Divi library into your staging Canvas. Add a saved layout, customize it to your needs and compare it to your current design.
Build out your redesign section by section. Assign option group presets to buttons, headings, spacing and more. You You can also use Find and Replace here.
Working with multiple staging canvases
You are not limited to one staging Canvas. Create several to test different directions for the same page. Perhaps one canvas gets a bold new hero section, while the other stays closer to the original with minor adjustments.
Duplicate your main canvas as many times as you need. Give each version a clear name: ‘Homepage Draft A’, ‘Homepage Draft B’, and so on. Switch between them using the Canvas dropdown to compare layouts side by side.
This setup works well for customer projects. Build two or three variations and then go through each option during an assessment meeting to discuss the pros and cons of each option. Once everyone agrees on a direction, you can move forward.
Preview your phased changes
Open the Canvas dropdown at the top of the builder. Select your staging canvas to load it and then select Main Canvas to load your live version. Go back and forth a few times. The visual difference becomes apparent when you browse between them.
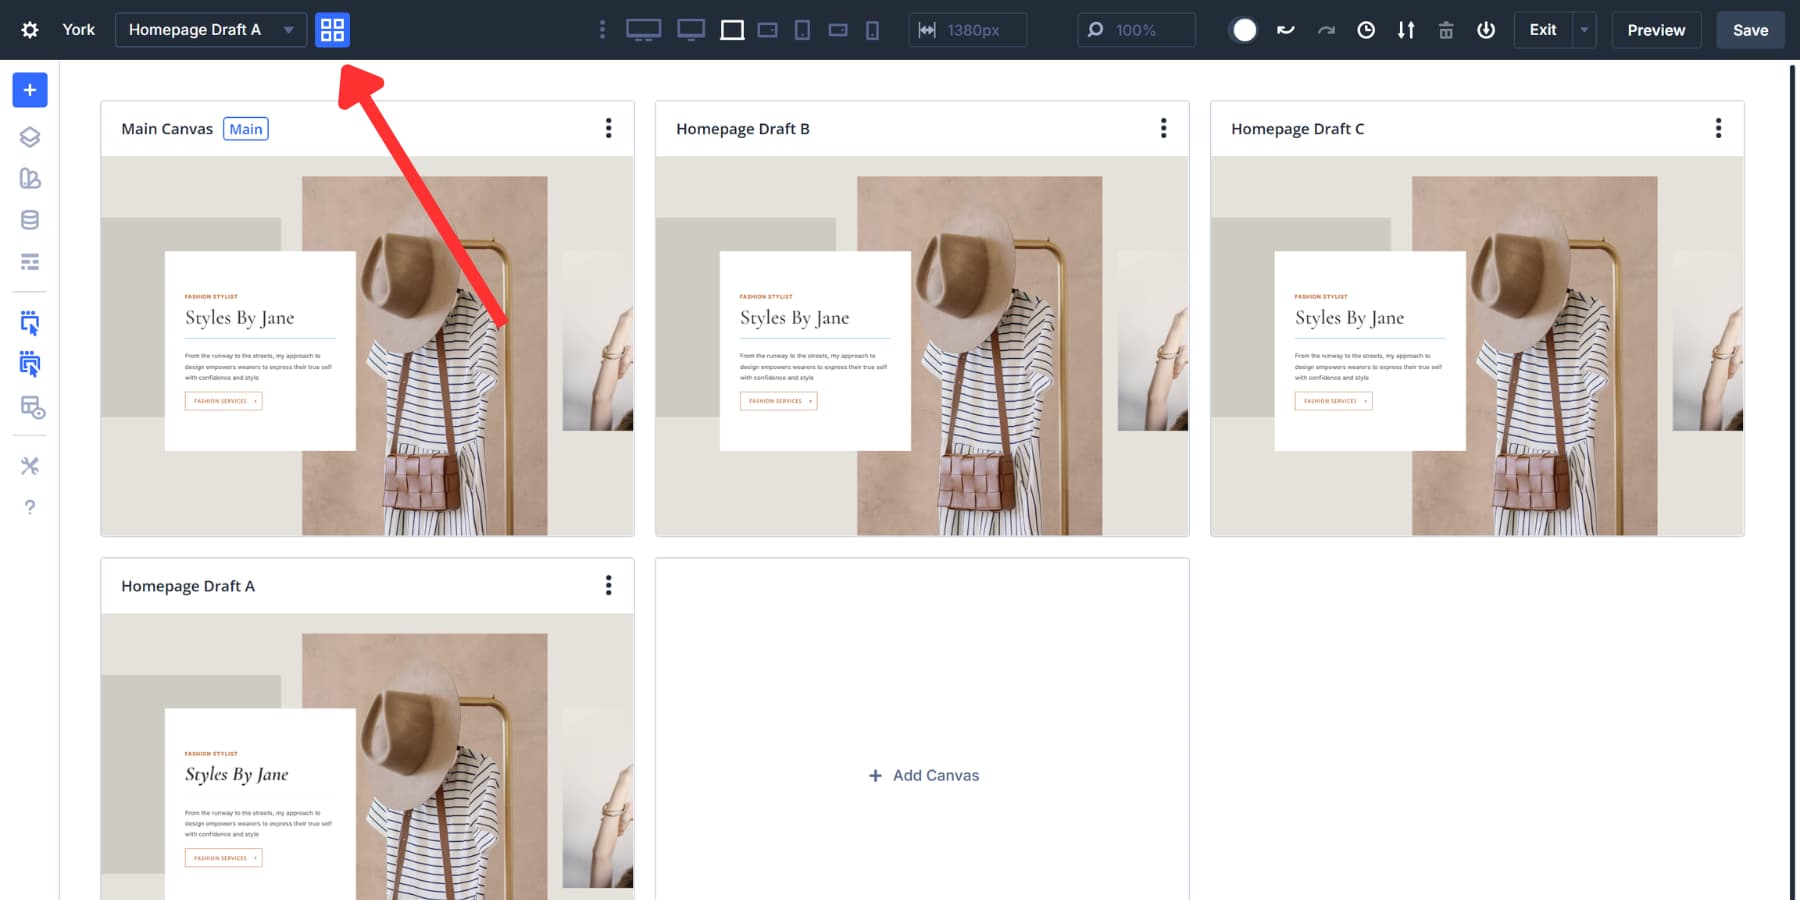
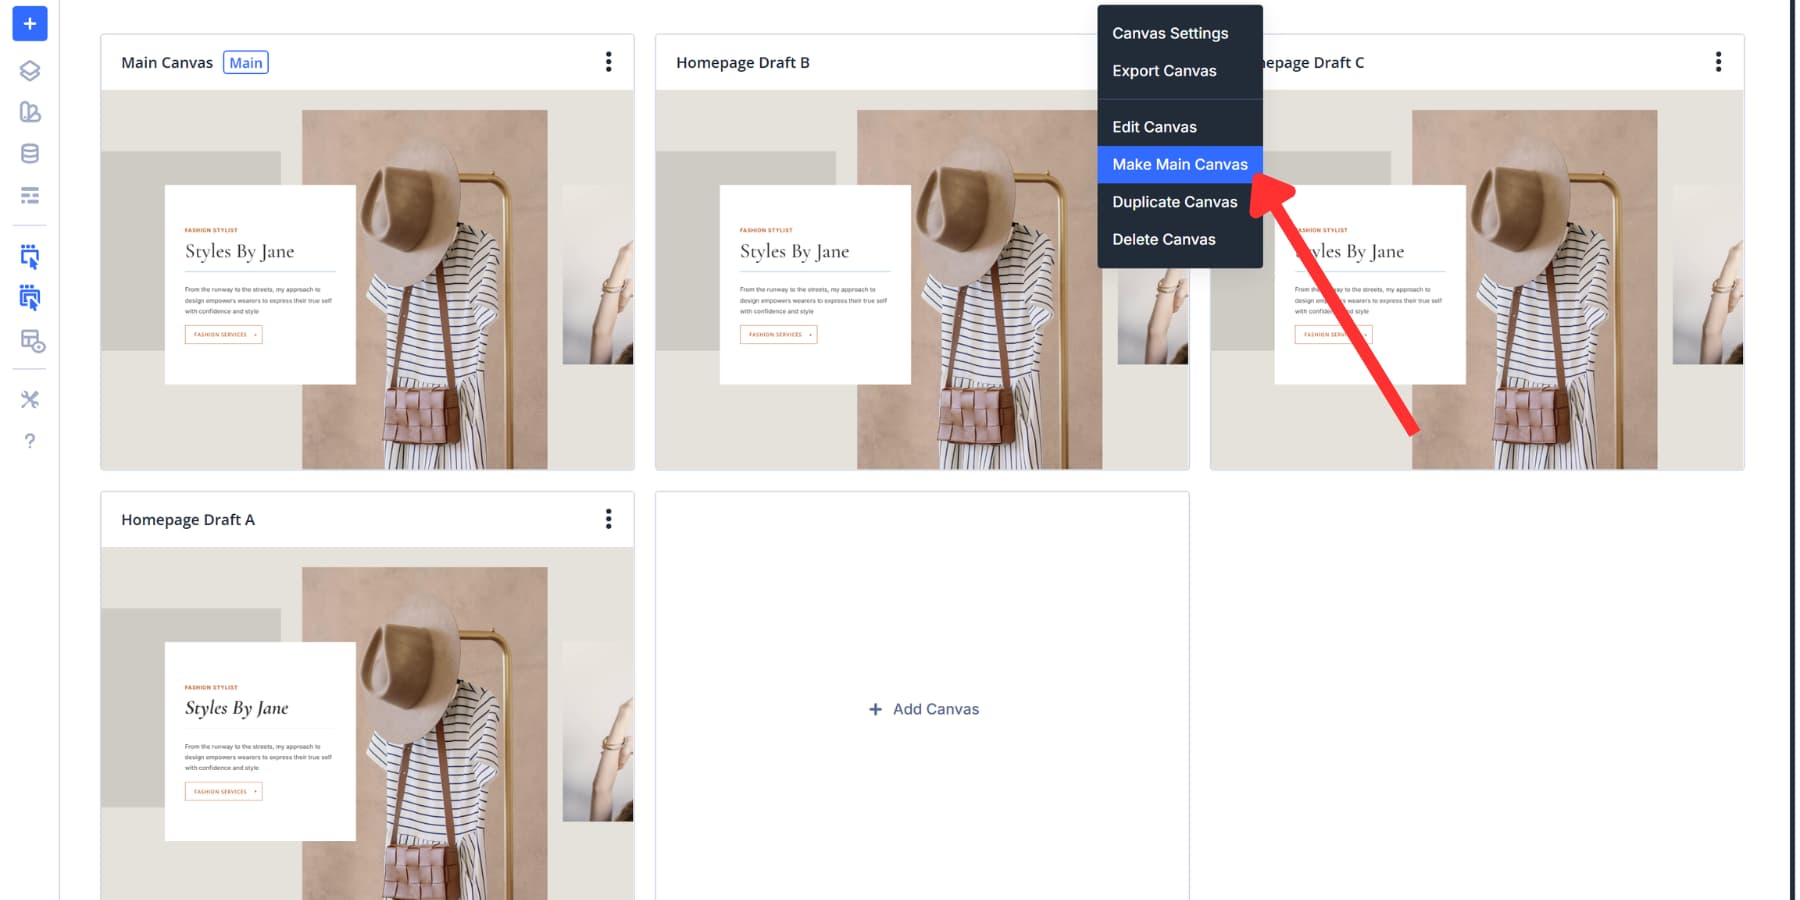
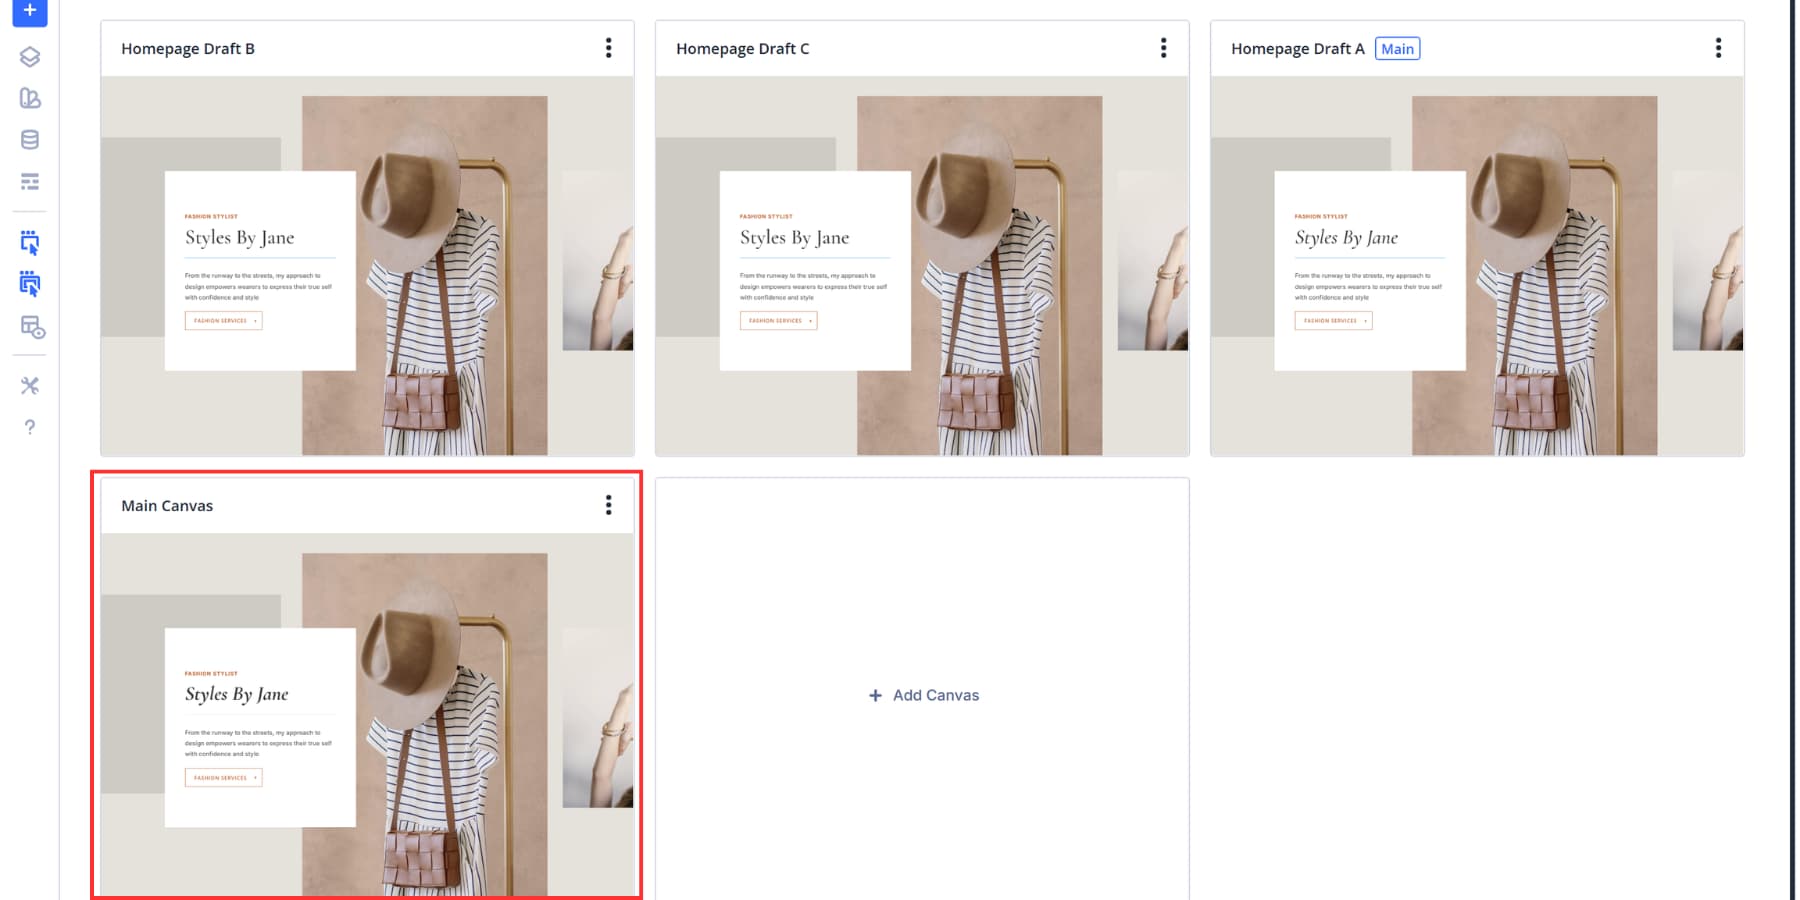
The canvas grid view provides an alternative way to compare. Click the grid icon next to the Canvas dropdown. All your canvases appear as tiles with visual previews. Your Main Canvas and staging versions sit side by side, so you can see the differences at a glance.
Make your staging canvas live
Once your redesign is complete and looking good, it’s time to make it live. Open the Canvas dropdown and hover over your staging canvas. Assign the canvas as the main canvas, then click Publish. Your staging design immediately replaces the old layout.
You can also use the canvas grid view for this step. Right-click on your staging canvas and select ‘Make Main Canvas’ from the menu.
The exchange takes place immediately as soon as you publish. Your visitors will now see the new version on the front, while your old main canvas becomes a free-standing canvas. You can keep the old version in case you need to refer to it later or switch back.
Your previous Main Canvas will remain available as a standalone canvas, which can be confusing when you view your canvas list later.
Consider immediately renaming it to something like “Previous Home Page Design,” “Backup January 2026,” or “Original Layout Archive” to stay organized.
You can also delete the old canvas from the same options dialog box if you’re sure the new design works well. Keep it for a week or two while you monitor visitor feedback, then delete the backup to keep your canvas list clean.
Try Canvases in Divi 5 today!
Organizing website changes with Divi Canvases removes friction from your redesign process. You can test freely, compare versions side-by-side, and push updates live without having to touch staging servers or local builds. The entire workflow remains within the Visual Builder, where you are already working.
However, cloth does more than stage. Use them for off-canvas menus, popups, sidebars, or any single component you need. Activate them with Interactions or post them with Canvas Portals.
Buy Divi 5 today and see why it’s the best Divi version out there!
#website #canvases #Divi