
Blackbird was a fun, experimental site that I used as a way to become familiar with WebGL in Solid.js. It went through the story of how the SR-71 was built in super technical details. The here that is being treated here helped with visualizing the technology under the surface of the SR-71, while the polished outside was visible that corresponded to the aesthetics of the locations.
Here is what the effect looks on the BlackBird site:
In this tutorial we will rebuild that effect completely: display a model twice, once as a fixed one and once as a wire frame, and then combine the two together in a shader for a smooth, animated transition. The end result is a flexible technique that you can use for technical revelations, holograms or any time when you want to show both the structure and the surface of a 3D object.
There are three things at work here: material properties, display goals and a black-and-white shader gradient. Let’s go in!
But first a bit about solid.js
Solid.js is not a framework name that you often hear, I have changed my personal work for the ridiculous Minimal developer experience and because JSX stays best since sliced bread. You absolutely do not have to use the fixed part of this demo.You could strip it and still use vanilla JS. But maybe knows, you can enjoy it 🙂
Fascinated? Check out Solid.js.
Why I switched
TLDR: Full-stack JSX without all the opinions of Next and Nute, plus it is like 8kb gzipt, wild.
The technical version: Written in JSX, but does not use a virtual cathedral, so a “reactive” (think of useState()) does not represent a complete component again, only one Dom node. Isomorphic also runs, so "use client" is a thing of the past.
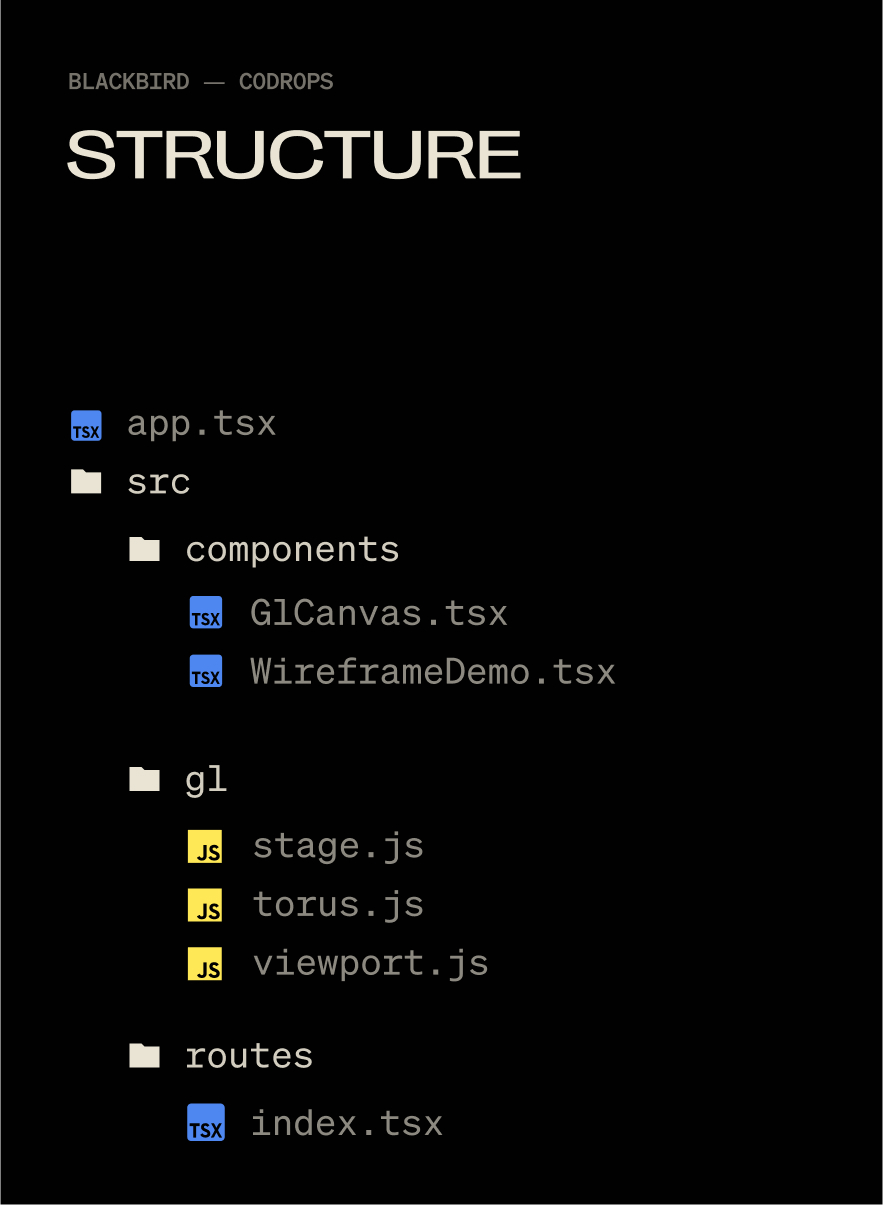
Setting up our scene
We don’t need anything wild for the effect: a mesh, camera, renderer and scene will be enough. I use a base Stage Class (for mentioning theatrical name) to check when things are initialized.
A global object for keeping track of window dimensions
window.innerWidth And window.innerHeight Trigger Document Reflow when you use them (more about Document Reflow here). So I keep them in one object, update it only when needed and read from the object, instead of using it window And causing reflow. Note that these are all ready 0 And no actual values as standard. window is evaluated as undefined When using SSR, so we want to wait to set this until our app is mounted, GL -Class is initialized and window is defined to prevent everyone’s favorite error: Can’t read characteristics of undefined (‘Window’).
// src/gl/viewport.js

export const viewport = {
  width: 0,
  height: 0,
  devicePixelRatio: 1,
  aspectRatio: 0,
};

export const resizeViewport = () => {
  viewport.width = window.innerWidth;
  viewport.height = window.innerHeight;

  viewport.aspectRatio = viewport.width / viewport.height;

  viewport.devicePixelRatio = Math.min(window.devicePixelRatio, 2);
};
A base three.js scene, renderer and camera
Before we can display something, we need a small framework to process our scene setup, displaying loop and the format of logic. Instead of spreading this over several files, we wrap it in one Stage Class that initializes the camera, renderer and scene in one place. This makes it easier to keep our WebGL life cycle organized, especially as soon as we start adding more complex objects and effects.
// src/gl/stage.js

import { WebGLRenderer, Scene, PerspectiveCamera } from 'three';
import { viewport, resizeViewport } from './viewport';

class Stage {
  init(element) {
    resizeViewport() // Set the initial viewport dimensions, helps to avoid using window inside of viewport.js for SSR-friendliness

    this.camera = new PerspectiveCamera(45, viewport.aspectRatio, 0.1, 1000);
    this.camera.position.set(0, 0, 2); // back the camera up 2 units so it isn't on top of the meshes we make later, you won't see them otherwise.

    this.renderer = new WebGLRenderer();
    this.renderer.setSize(viewport.width, viewport.height);
    element.appendChild(this.renderer.domElement); // attach the renderer to the dom so our canvas shows up

    this.renderer.setPixelRatio(viewport.devicePixelRatio); // Renders higher pixel ratios for screens that require it.

    this.scene = new Scene();
  }

  render() {
    this.renderer.render(this.scene, this.camera);
    requestAnimationFrame(this.render.bind(this));
// All of the scenes child classes with a render method will have it called automatically
    this.scene.children.forEach((child) => {
      if (child.render && typeof child.render === 'function') {
        child.render();
      }
    });
  }

  resize() {
    this.renderer.setSize(viewport.width, viewport.height);
    this.camera.aspect = viewport.aspectRatio;
    this.camera.updateProjectionMatrix();

// All of the scenes child classes with a resize method will have it called automatically
    this.scene.children.forEach((child) => {
      if (child.resize && typeof child.resize === 'function') {
        child.resize();
      }
    });
  }
}

export default new Stage();
And a chic mesh to go with it
With our stage ready, we can give it something interesting to perform. A torus button is perfect for this: it has many turns and details to show off both the wire frame and the solid fit. We start with a simple one MeshNormalMaterial In the Wireframe mode so that we can clearly see the structure before we continue to the Blended Shader version.
// src/gl/torus.js

import { Mesh, MeshBasicMaterial, TorusKnotGeometry } from 'three';

export default class Torus extends Mesh {
  constructor() {
    super();

    this.geometry = new TorusKnotGeometry(1, 0.285, 300, 26);
    this.material = new MeshNormalMaterial({
      color: 0xffff00,
      wireframe: true,
    });

    this.position.set(0, 0, -8); // Back up the mesh from the camera so its visible
  }
}
A short comment about lights

We use meshNormal material for simplicity, so we don’t have to mess with lights. The original effect on Blackbird had six lights, Waaay too much. The GPU on my M1 Max was suffocated to 30 fps to display the complex models And Real -time six -point lighting. But this reduces only 2 lights (which looked visually identical) ran no problem at 120 fps. Three.js is not like blender where you can plop in 14 lights and torture your fleshy computer with the render for 12 hours while you sleep. The lights in WebGL have consequences 🫠
Now, the solid JSX components to house it all
// src/components/GlCanvas.tsx

import { onMount, onCleanup } from 'solid-js';
import Stage from '~/gl/stage';

export default function GlCanvas() {
// let is used instead of refs, these aren't reactive
  let el;
  let gl;
  let observer;

  onMount(() => {
    if(!el) return
    gl = Stage;

    gl.init(el);
    gl.render();


    observer = new ResizeObserver((entry) => gl.resize());
    observer.observe(el); // use ResizeObserver instead of the window resize event.
    // It is debounced AND fires once when initialized, no need to call resize() onMount
  });

  onCleanup(() => {
    if (observer) {
      observer.disconnect();
    }
  });


  return (

  );
}
let is used to explain a ref, there is no formal useRef() Function in solid. Signals are the only reactive method. Read more about Refs in solid.
Then hit that component app.tsx:
// src/app.tsx

import { Router } from '@solidjs/router';
import { FileRoutes } from '@solidjs/start/router';
import { Suspense } from 'solid-js';
import GlCanvas from './components/GlCanvas';

export default function App() {
  return (
     (

          {props.children}


      )}
    >


  );
}
Each 3D piece that I use is bound by a specific element on the page (usually for timeline and scrolling), so I make an individual component to control each class. This helps me to stay organized when I have 5 or 6 webgl moments on one page.
// src/components/WireframeDemo.tsx

import { createEffect, createSignal, onMount } from 'solid-js'
import Stage from '~/gl/stage';
import Torus from '~/gl/torus';

export default function WireframeDemo() {
  let el;
  const [element, setElement] = createSignal(null);
  const [actor, setActor] = createSignal(null);

  createEffect(() => {
    setElement(el);
    if (!element()) return;

    setActor(new Torus()); // Stage is initialized when the page initially mounts,
    // so it's not available until the next tick.
    // A signal forces this update to the next tick,
    // after Stage is available.

    Stage.scene.add(actor());
  });

  return ;
}
createEffect() instead of onMount(): This automatically follows dependencies (elementAnd actor in this case) and fires the function when they change, no more useEffect() With dependency sancrays 🙃. Read more about Creative effect in solid.
Then a minimal route to set up the component:
// src/routes/index.tsx

import WireframeDemo from '~/components/WiframeDemo';

export default function Home() {
  return (


  );
}
Now you will see this:

Switch a material to wire frame
I loved Wireframe styling for the Blackbird site! It fits with the prototype feeling of the story, fully textured models felt too clean, wire frames are a bit “dirty” and unpolished. With this you can do just about every material in three.js with this wire:
// /gl/torus.js

  this.material.wireframe = true
  this.material.needsUpdate = true;
But we want to do this dynamically on just a part of our model, not all about the whole thing.
Enter render goals.
The nice part: Render Doelen
Render goals are a super deep subject, but they come down to this: what you see on the screen is a frame for your GPU to display, in WebGL you can export that frame and reuse it as a texture on another mesh, you make a “goal” for your display output, a ramp.
Because we need two of these goals, we can make a single class and reuse them.
// src/gl/render-target.js

import { WebGLRenderTarget } from 'three';
import { viewport } from '../viewport';
import Torus from '../torus';
import Stage from '../stage';

export default class RenderTarget extends WebGLRenderTarget {
  constructor() {
    super();

    this.width = viewport.width * viewport.devicePixelRatio;
    this.height = viewport.height * viewport.devicePixelRatio;
  }

  resize() {
    const w = viewport.width * viewport.devicePixelRatio;
    const h = viewport.height * viewport.devicePixelRatio;

    this.setSize(w, h)
  }
}
This is just an output for a texture, nothing more.
Now we can make the class that uses these outputs. They are many lessons, I know, but splitting individual units such as this helps me to keep track of where things happen. 800-line spaghetti mega classes are the stuff of nightmares when debugging Webgl.
// src/gl/targeted-torus.js

import {
  Mesh,
  MeshNormalMaterial,
  PerspectiveCamera,
  PlaneGeometry,
} from 'three';
import Torus from './torus';
import { viewport } from './viewport';
import RenderTarget from './render-target';
import Stage from './stage';

export default class TargetedTorus extends Mesh {
  targetSolid = new RenderTarget();
  targetWireframe = new RenderTarget();

  scene = new Torus(); // The shape we created earlier
  camera = new PerspectiveCamera(45, viewport.aspectRatio, 0.1, 1000);

  constructor() {
    super();

    this.geometry = new PlaneGeometry(1, 1);
    this.material = new MeshNormalMaterial();
  }

  resize() {
    this.targetSolid.resize();
    this.targetWireframe.resize();

    this.camera.aspect = viewport.aspectRatio;
    this.camera.updateProjectionMatrix();
  }
}
Now change our WireframeDemo.tsx component to the TargetedTorus class, instead of Torus:
// src/components/WireframeDemo.tsx

import { createEffect, createSignal, onMount } from 'solid-js';
import Stage from '~/gl/stage';
import TargetedTorus from '~/gl/targeted-torus';

export default function WireframeDemo() {
  let el;
  const [element, setElement] = createSignal(null);
  const [actor, setActor] = createSignal(null);

  createEffect(() => {
    setElement(el);
    if (!element()) return;

    setActor(new TargetedTorus()); // << change me

    Stage.scene.add(actor());
  });

  return ;
}
“Now I only see a blue square Nathan, it feels like we’re going backwards, shows me the cool shape again”.
Shhhhh, it’s because of design, I swear!

From meshnormal material to shadow water
We can now take our torus -rendered output and hit it on the blue surface as a texture using ShaderMaterial. MeshNormalMaterial Let us not use texture, and we still need shaders quickly. Inside targeted-torus.js Remove the MeshNormalMaterial And call in this:
// src/gl/targeted-torus.js

this.material = new ShaderMaterial({
  vertexShader: `
    varying vec2 v_uv;

    void main() {
      gl_Position = projectionMatrix * modelViewMatrix * vec4(position, 1.0);
      v_uv = uv;
    }
  `,
  fragmentShader: `
    varying vec2 v_uv;
    varying vec3 v_position;

    void main() {
      gl_FragColor = vec4(0.67, 0.08, 0.86, 1.0);
    }
  `,
});
Now we have one a lot of More beautiful purple flat with the help of two shaders:
- Vertex Shaders manipulate corner point locations of our material, we are not going to touch this further
- Fragment Shaders assign the colors and properties to every pixel of our material. This shader tells every pixel to be purple
Using the Render Target texture
To show our Torus instead of that purple color, we can feed the fragment shader an image texture via uniforms:
// src/gl/targeted-torus.js

this.material = new ShaderMaterial({
  vertexShader: `
    varying vec2 v_uv;

    void main() {
      gl_Position = projectionMatrix * modelViewMatrix * vec4(position, 1.0);
      v_uv = uv;
    }
  `,
  fragmentShader: `
    varying vec2 v_uv;
    varying vec3 v_position;

    // declare 2 uniforms
    uniform sampler2D u_texture_solid;
    uniform sampler2D u_texture_wireframe;

    void main() {
      // declare 2 images
      vec4 wireframe_texture = texture2D(u_texture_wireframe, v_uv);
      vec4 solid_texture = texture2D(u_texture_solid, v_uv);

      // set the color to that of the image
      gl_FragColor = solid_texture;
    }
  `,
  uniforms: {
    u_texture_solid: { value: this.targetSolid.texture },
    u_texture_wireframe: { value: this.targetWireframe.texture },
  },
});
And add a render method to our TargetedTorus class (this is automatically mentioned by the Stage class):
// src/gl/targeted-torus.js

render() {
  this.material.uniforms.u_texture_solid.value = this.targetSolid.texture;

  Stage.renderer.render(this.scene, this.camera);
  Stage.renderer.setRenderTarget(this.targetSolid);
  Stage.renderer.clear();
  Stage.renderer.setRenderTarget(null);
}
The torus is back. We have passed on our image texture to the Shader and performing our original render.

Mix wire frame and solid materials with shaders
Shaders were black magic for me for this project. It was my first time they used them in production and I am used to being frontend where you think in boxes. Shaders are coordinates 0 to 1, which I find much more difficult to understand. But I had used photoshop and after effects with layers enough. These applications do many of the same working screens can: GPU Computing. This made it much easier. Starting by imagining or signing what I wanted, thinking how I could do it in Photoshop, Than I wonder how I could do it with Shaders. Photoshop of AE is in Shaders far Less mentally stressful if you don’t have a deep basis in shaders.
Both Render Filled goals
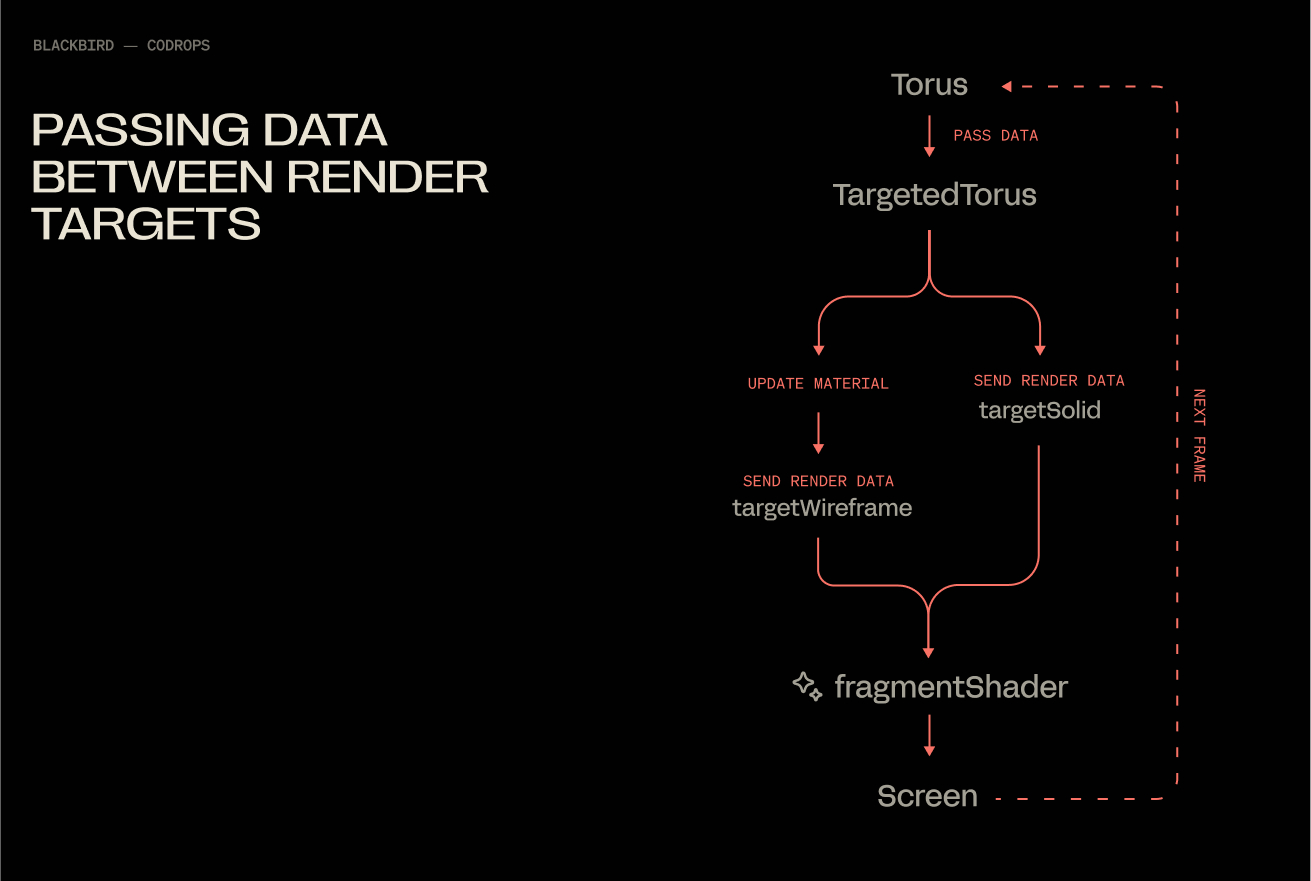
At the moment we only store data on the solidTarget Render Target via norms. We will update our render loop so that our shadow them both this and wireframeTarget available simultaneously.
// src/gl/targeted-torus.js

render() {
  // Render wireframe version to wireframe render target
  this.scene.material.wireframe = true;
  Stage.renderer.setRenderTarget(this.targetWireframe);
  Stage.renderer.render(this.scene, this.camera);
  this.material.uniforms.u_texture_wireframe.value = this.targetWireframe.texture;

  // Render solid version to solid render target
  this.scene.material.wireframe = false;
  Stage.renderer.setRenderTarget(this.targetSolid);
  Stage.renderer.render(this.scene, this.camera);
  this.material.uniforms.u_texture_solid.value = this.targetSolid.texture;

  // Reset render target
  Stage.renderer.setRenderTarget(null);
}
This ends with a current that looks like this under the hood:
Fade between two textures
Our Fragment Shader gets a small update, 2 additions:
- Smoothstep creates a linear slope between 2 values. UVS only goes from 0 to 1, so in this case we use
.15And.65If the limits (they seem to make the effect clearer than 0 and 1). We then use the X value of the UVS to determine which value is entered in Smoothstep. vec4 mixed = mix(wireframe_texture, solid_texture, blend);Mix does exactly what it says, mixes 2 values together in a ratio determined by blend..5Be a perfectly even split.
// src/gl/targeted-torus.js

fragmentShader: `
  varying vec2 v_uv;
  varying vec3 v_position;

  // declare 2 uniforms
  uniform sampler2D u_texture_solid;
  uniform sampler2D u_texture_wireframe;

  void main() {
    // declare 2 images
    vec4 wireframe_texture = texture2D(u_texture_wireframe, v_uv);
    vec4 solid_texture = texture2D(u_texture_solid, v_uv);

    float blend = smoothstep(0.15, 0.65, v_uv.x);
    vec4 mixed = mix(wireframe_texture, solid_texture, blend);

    gl_FragColor = mixed;
  }
`,
And boom, MIXED:
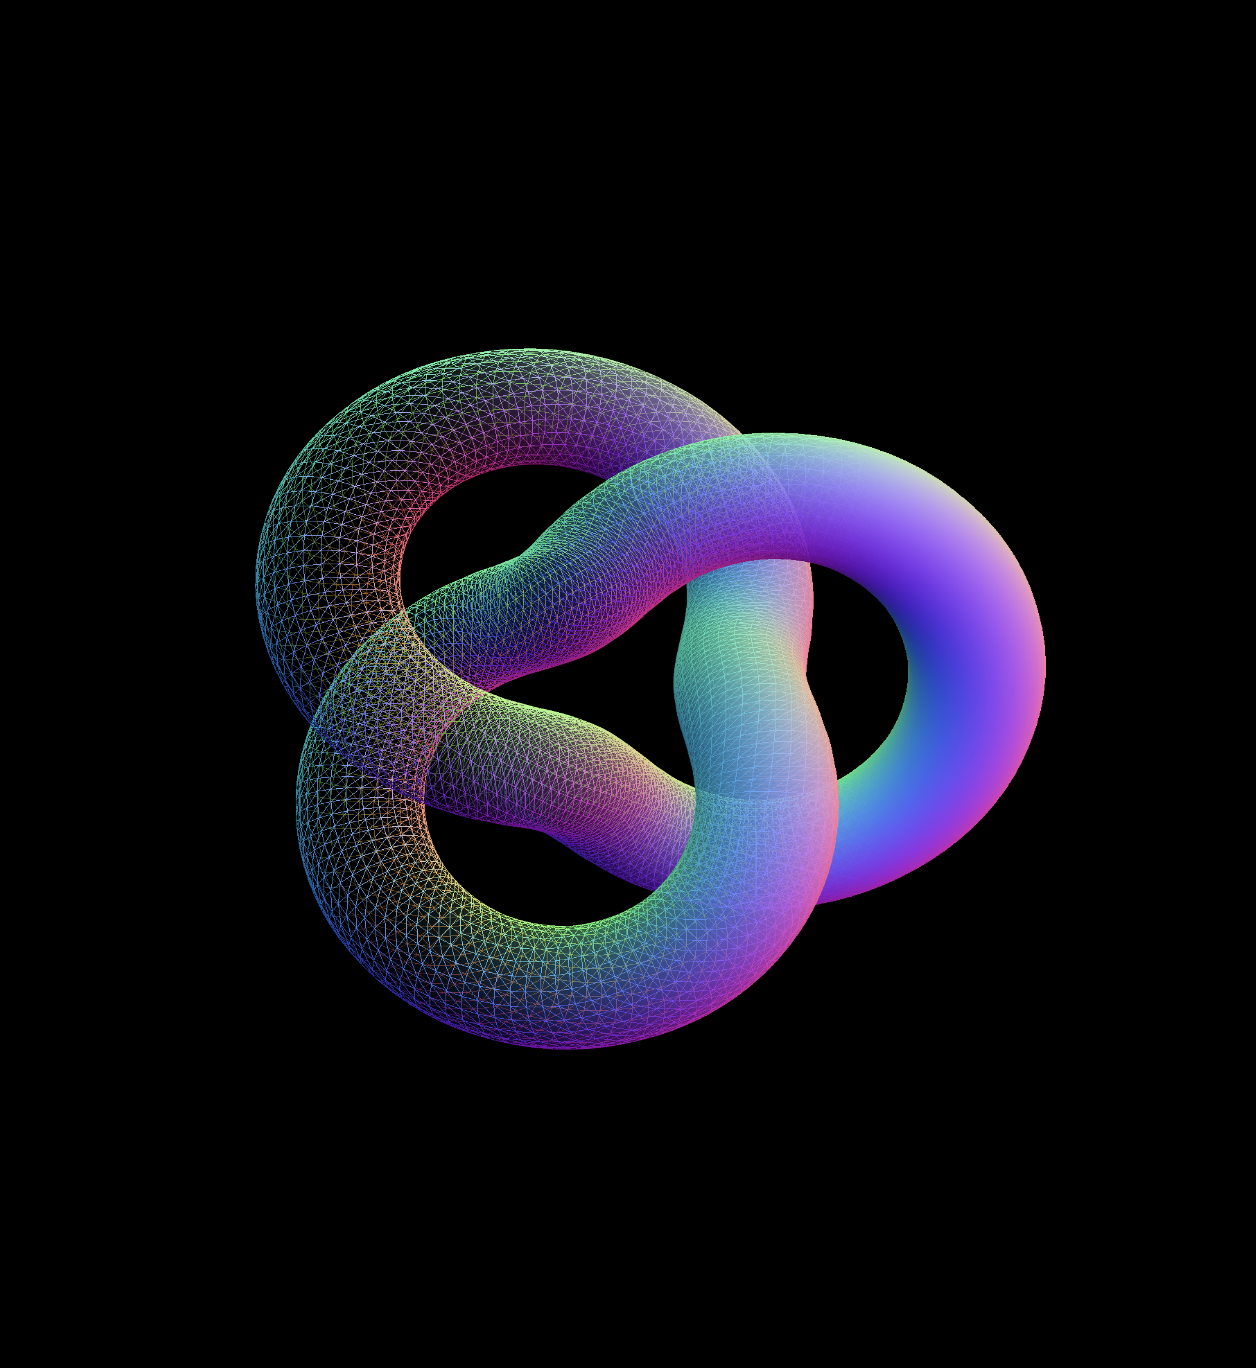
Let’s be honest with ourselves, this looks great boring to be static, so that we can brighten this up with little magic from GSAP.
// src/gl/torus.js

import {
  Mesh,
  MeshNormalMaterial,
  TorusKnotGeometry,
} from 'three';
import gsap from 'gsap';

export default class Torus extends Mesh {
  constructor() {
    super();

    this.geometry = new TorusKnotGeometry(1, 0.285, 300, 26);
    this.material = new MeshNormalMaterial();

    this.position.set(0, 0, -8);

    // add me!
    gsap.to(this.rotation, {
      y: 540 * (Math.PI / 180), // needs to be in radians, not degrees
      ease: 'power3.inOut',
      duration: 4,
      repeat: -1,
      yoyo: true,
    });
  }
}Thank you!
Congratulations, you have officially spent a measurable part of your day merging two materials together. However, it was worth it, right? I hope this has saved you some From the mental gymnastics that orchestrate a few render goals.
Have questions? Save me Twitter!

#Building #mixed #material #Shader #WebGL #Solid.js #Codrops